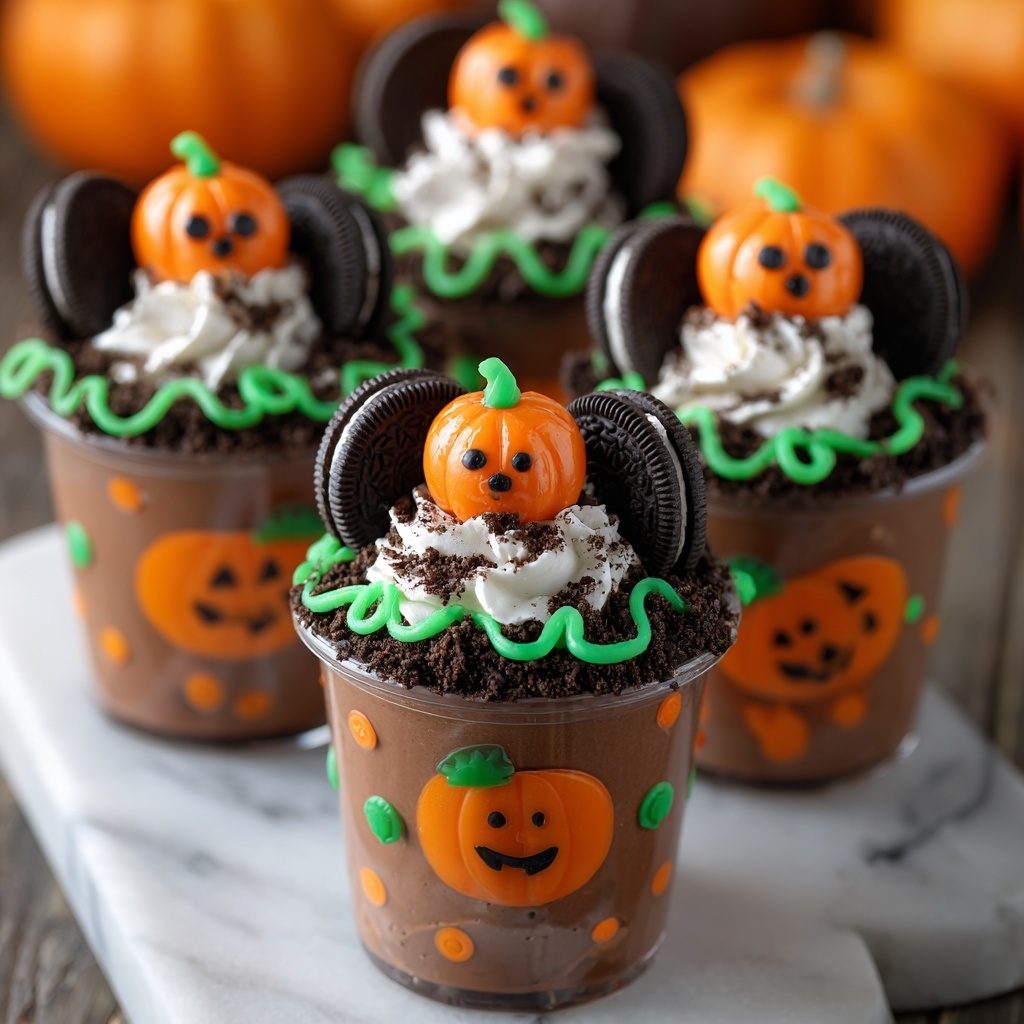
If you’re searching for a fun and festive fall treat that’s as delightful to make as it is to eat, look no further. This Pumpkin Patch Dirt Cups Recipe is a charming dessert that brings together rich chocolate pudding, crumbly cookie “dirt,” and adorable candy pumpkins, creating a whimsical pumpkin patch in every cup. It’s perfect for cozy autumn gatherings, Halloween parties, or simply brightening up a chilly day with a sweet surprise that’s sure to put a smile on everyone’s face.

Ingredients You’ll Need
These ingredients are straightforward but play a crucial role in building the irresistible layers of this dessert. Each component contributes its own flavor and texture to bring your pumpkin patch to life.
- Instant chocolate pudding mix: The creamy and chocolatey base that gives the dessert its luscious body.
- Cold milk: Essential for whipping up the pudding to the right consistency without lumps.
- Whipped topping: Adds lightness and a dreamy creaminess that balances the rich chocolate flavor.
- Chocolate sandwich cookies: Crushed to create the perfect “dirt” topping with a satisfying crunch.
- Candy pumpkins: These festive decorations bring a pop of color and playful mood to each cup.
- Green sprinkles or edible grass: Mimic pumpkin vines and add a fresh, colorful touch.
- Optional serving cups: Clear plastic cups or mason jars work wonders to showcase the layers beautifully.
How to Make Pumpkin Patch Dirt Cups Recipe
Step 1: Whisk Pudding Mix with Milk
Start by combining the instant chocolate pudding mix with cold milk in a mixing bowl. Whisk it vigorously for about 2 minutes until the mixture thickens slightly. Then let it rest for 5 minutes to set; this ensures a smooth and creamy pudding base that’s perfect for layering.
Step 2: Fold in Whipped Topping
Gently fold the whipped topping into the thickened pudding. This step is incredibly satisfying as the mixture transforms into a fluffy, velvety texture. Folding preserves the lightness of the whipped topping and makes the whole dessert feel airy and indulgent.
Step 3: Fill Your Cups
Grab your clear cups or jars, and spoon the creamy pudding mixture into each, filling about three-quarters full. This sets the stage for the fun layers to come and lets the chocolate base peek through the “dirt” topping later.
Step 4: Add the Cookie Dirt
Sprinkle a generous layer of crushed chocolate sandwich cookies on top of the pudding in each cup. This crumbly “dirt” adds a delightful crunch and visual contrast, replicating a garden bed where your pumpkins will grow.
Step 5: Plant Candy Pumpkins
Press 2 to 3 candy pumpkins gently into the cookie dirt of each cup. Arranging them thoughtfully makes each cup look like a tiny pumpkin patch ready for harvest. These little pumpkins are the star decoration that instantly turns this dessert into a festive fall favorite.
Step 6: Decorate with Green Sprinkles
To finish the look, sprinkle on green sprinkles, edible grass, or green-tinted coconut flakes to mimic vines snaking through the soil. This step adds a burst of color and a whimsical, garden-inspired aesthetic that makes these cups truly special.
Step 7: Chill Before Serving
Pop your pumpkin patch dirt cups into the refrigerator to chill for at least 30 minutes. This lets everything set nicely and allows the flavors to meld beautifully, making each spoonful even more satisfying.
How to Serve Pumpkin Patch Dirt Cups Recipe
Garnishes
Garnishing is your chance to get playful! Consider topping your cups with extra candy pumpkins, mini chocolate chips, or even edible glitter for a sparkling pumpkin patch. Fresh mint leaves or a dusting of cinnamon adds an inviting aroma that hints at cozy fall flavors.
Side Dishes
While these dirt cups are delightful on their own, pairing them with lightly spiced apple cider or a warm chai latte elevates the fall vibe. For a more substantial snack, serve alongside spiced nuts or a crisp apple salad for a balanced bite.
Creative Ways to Present
Clear mason jars or small glass bowls highlight the delicious layers and heighten the effect of your mini pumpkin patches. For larger gatherings, consider assembling the dessert in an oversized trifle bowl to create a shared centerpiece, complete with a scattering of candy pumpkins and edible moss on top for a wow factor.
Make Ahead and Storage
Storing Leftovers
You can store leftover cups covered tightly in the refrigerator for up to 3 days. The cookie “dirt” might soften slightly, but the pudding will stay smooth and delicious. For best texture, add extra crushed cookies and pumpkins right before serving.
Freezing
Freezing pumpkin patch dirt cups is not recommended because the pudding and whipped topping textures do not freeze well and tend to become icy or separate upon thawing. It’s better enjoyed fresh or chilled in the fridge.
Reheating
Since this dessert is served cold, reheating isn’t necessary. Simply let refrigerated cups sit at room temperature for a few minutes before serving if they’ve been chilled for longer than desired. Enjoy as a cool and refreshing treat.
FAQs
Can I use homemade pudding instead of instant mix?
Absolutely! Homemade pudding will taste fantastic and gives you control over sweetness. Just make sure it’s fully chilled before folding in the whipped topping for the best texture.
What are good alternatives to candy pumpkins?
If candy pumpkins aren’t available, mini pumpkin-shaped gummies or even orange jelly beans can offer a similar fun and festive look in your pumpkin patch dirt cups.
Can I make this recipe dairy-free?
Yes, by using dairy-free chocolate pudding mix, plant-based milk, and whipped topping alternatives, you can easily adapt this recipe to fit a dairy-free diet without sacrificing flavor or texture.
How many Pumpkin Patch Dirt Cups Recipe servings does this make?
The recipe yields about 8 to 12 servings depending on the size of your serving cups, making it perfect for a family gathering or party buffet dessert table.
Is there a way to make the dirt layer crunchier?
For extra crunch, try mixing crushed graham crackers or adding some toasted nuts to your crushed cookie “dirt” layer. Just be mindful of allergies and taste balance.
Final Thoughts
The Pumpkin Patch Dirt Cups Recipe is one of those easy, joyful projects that bring warmth and laughter to any occasion. With each spoonful bursting with creamy chocolate, crunchy dirt, and festive pumpkins, it’s impossible not to smile. So go ahead and whip up a batch—you’ll love sharing these charming, tasty little cups that capture the very spirit of fall.
Print
Pumpkin Patch Dirt Cups Recipe
- Prep Time: 45 minutes
- Cook Time: 0 minutes
- Total Time: 45 minutes
- Yield: 8-12 servings
- Category: Dessert
- Method: No-Cook
- Cuisine: American
Description
Pumpkin Patch Dirt Cups are a fun and festive no-bake dessert perfect for fall celebrations. Layers of creamy chocolate pudding and whipped topping are topped with crushed chocolate cookies to resemble dirt, then decorated with candy pumpkins and edible green sprinkles to create a charming pumpkin patch effect. Easy to assemble in individual cups, these treats are ideal for Halloween parties or autumn gatherings.
Ingredients
Pudding Mixture
- 1 (3.9 oz) box instant chocolate pudding mix
- 2 cups cold milk
- 1 (8 oz) tub whipped topping
Dirt Topping
- 1 package chocolate sandwich cookies (like Oreos), crushed
Decorations
- 16–24 candy pumpkins
- Green sprinkles, edible grass, or green-tinted coconut flakes (for vines)
Optional
- Clear plastic cups or mason jars for serving
Instructions
- Make the pudding: In a mixing bowl, whisk the instant chocolate pudding mix with cold milk for 2 minutes until smooth. Let it sit for 5 minutes to thicken properly.
- Combine with whipped topping: Gently fold the whipped topping into the thickened pudding until fully incorporated and creamy, taking care not to deflate the mixture.
- Assemble the base: Spoon the pudding mixture into individual serving cups, filling each about ¾ full for room to add toppings.
- Add the “dirt” layer: Generously top each cup with a thick layer of crushed chocolate sandwich cookies to mimic soil texture.
- Place candy pumpkins: Press 2 to 3 candy pumpkins gently into the cookie layer of each cup for a festive autumn look.
- Create vines: Decorate with green sprinkles, edible grass, or green-tinted coconut flakes positioned around the pumpkins to resemble pumpkin vines.
- Chill and serve: Refrigerate the assembled cups for at least 30 minutes to let flavors meld and to set before serving.
Notes
- For a seasonal twist, add a layer of pumpkin-spice pudding underneath the chocolate pudding.
- Swap out the chocolate sandwich cookies for crushed graham crackers or gingersnaps for a different “soil” flavor and texture.
- Add gummy worms on top for a spooky Halloween effect.
- Using clear cups or mason jars adds to the layered visual appeal of the dessert.
- Best served chilled and within 1-2 days for freshness.