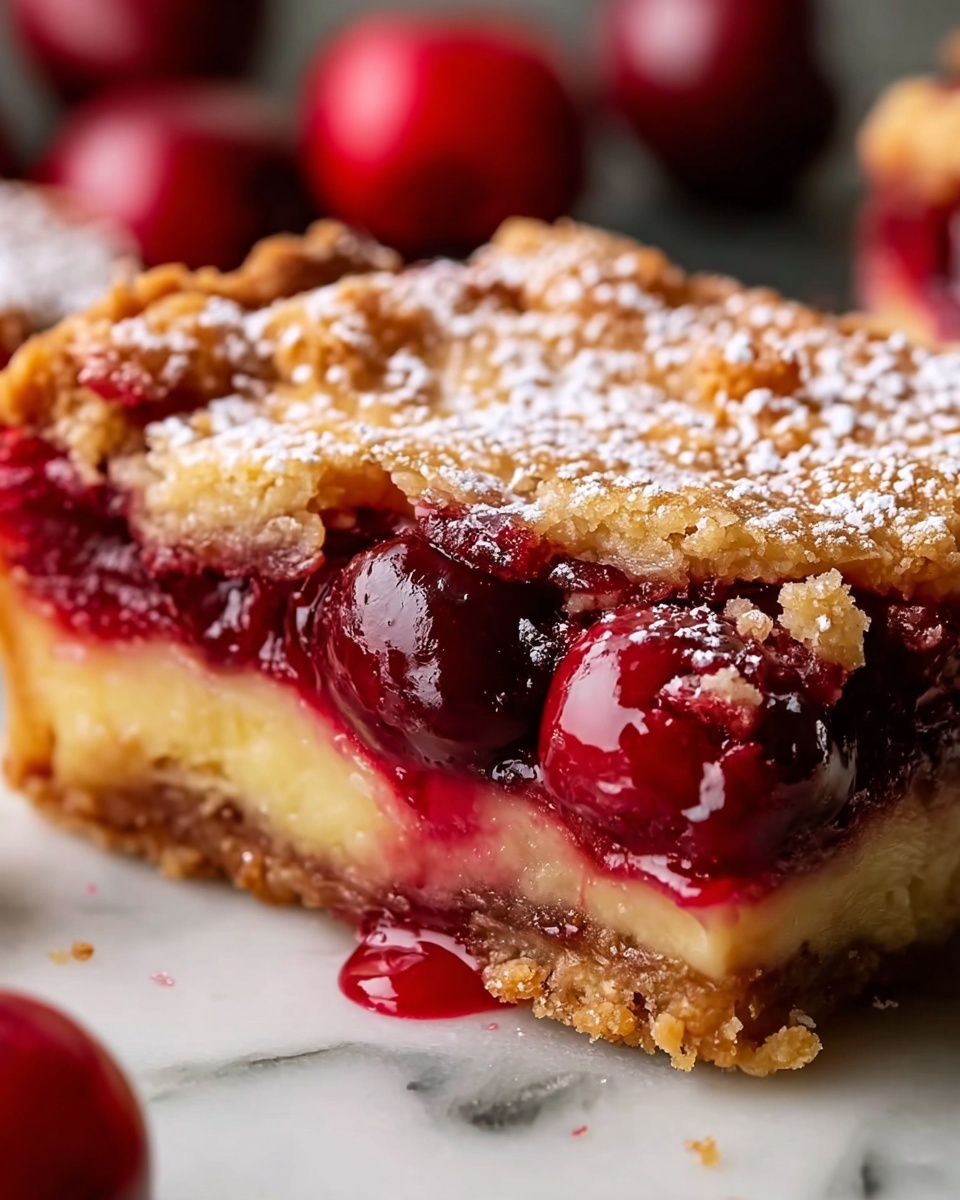
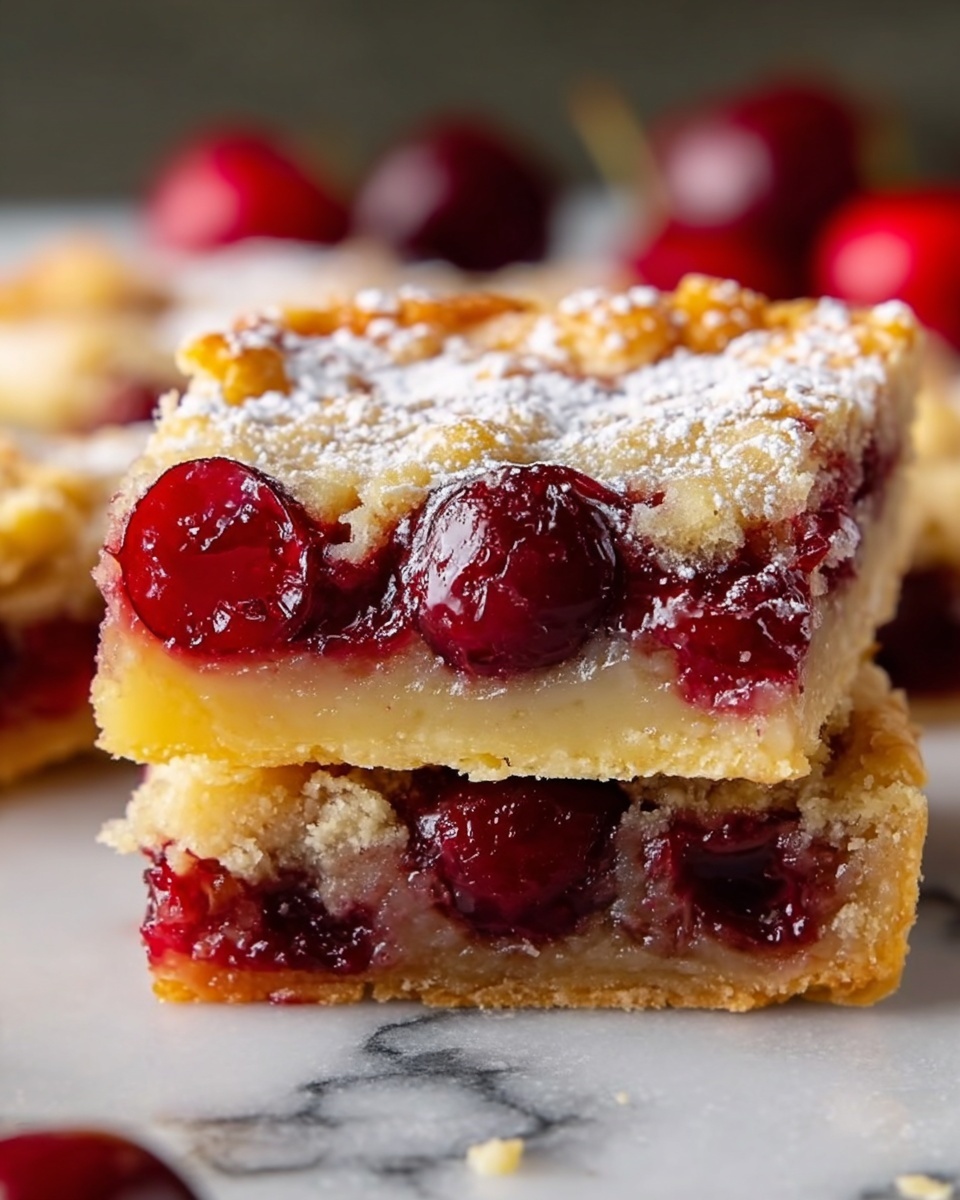
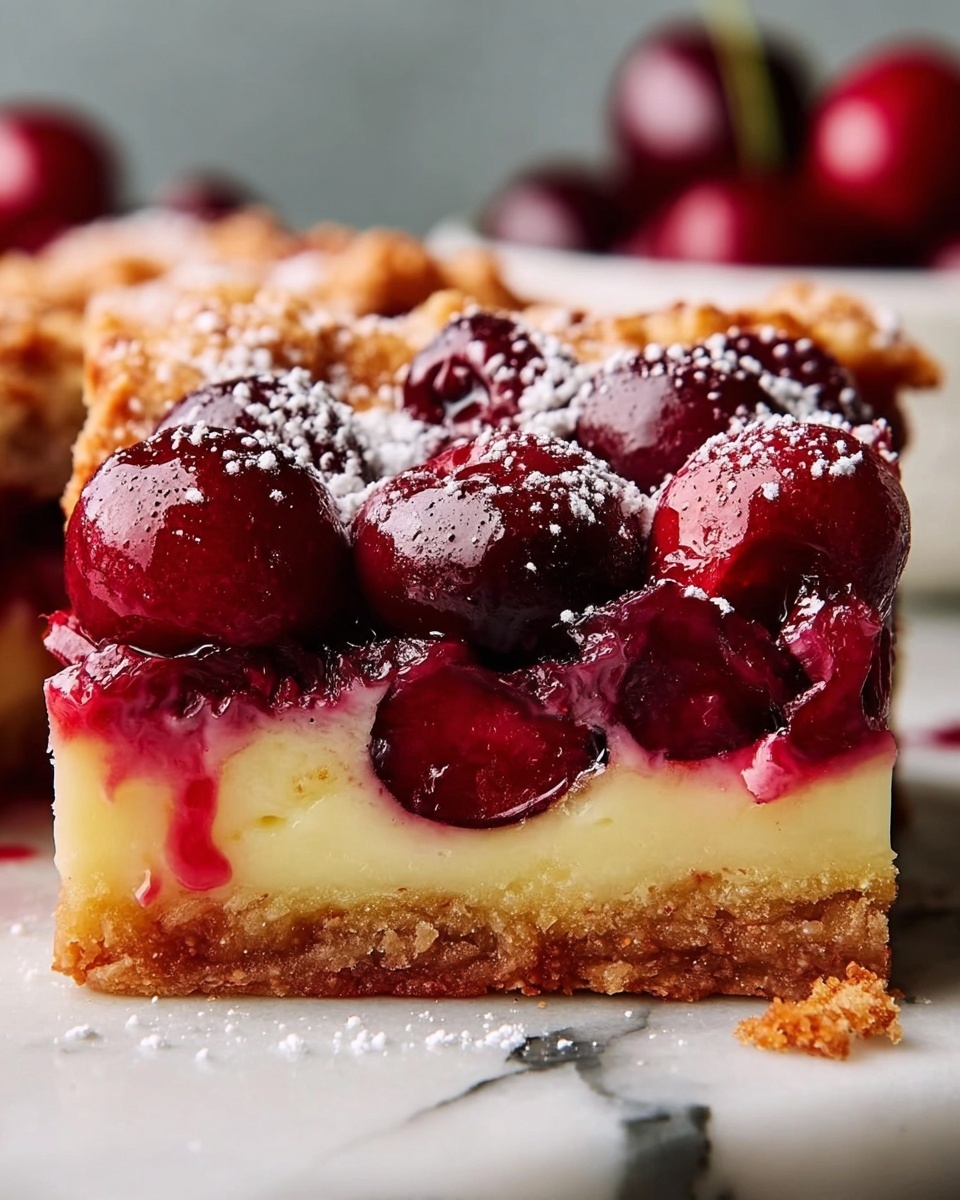
If you’ve ever dreamed of capturing the luscious, nostalgic flavors of a classic pie in a simpler, cut-and-serve form, you’re going to adore this Cherry Pie Bars Recipe. Imagine a buttery, tender crust layered with sweet, vibrant cherry pie filling, then topped with a delicate drizzle of almond-glazed sweetness. These bars are not only irresistibly delicious but also perfect for sharing at any celebration or as a delightful afternoon treat. Trust me, once you try this recipe, it will quickly become one of your favorite go-to desserts to bake again and again.
Ingredients You’ll Need
The magic of this Cherry Pie Bars Recipe lies in its straightforward ingredients. Each one plays a crucial role in building flavor, texture, and that beautiful color contrast that makes these bars so inviting.
- Unsalted butter, 1 cup, softened: Adds rich moisture and a tender crumb to the crust.
- Granulated sugar, 1 3/4 cups: Sweetens the dough perfectly without overpowering the cherry filling.
- Large eggs, 4: Bind the dough and create structure for fluffy bars.
- Vanilla extract, 1 teaspoon: Enhances the overall flavor with warm, sweet notes.
- Almond extract, 1/4 teaspoon plus 1/4 teaspoon for glaze: Brings an irresistible nutty twist that pairs beautifully with cherries.
- All-purpose flour, 3 cups: The foundation of the dough, providing stability and softness.
- Salt, 1/2 teaspoon: Balances the sweetness and highlights other flavors.
- Cherry pie filling, 1 (21-ounce) can: The star of the show, delivering juicy bursts of tartness and sweetness.
- Powdered sugar, 1 cup: Used to create a smooth, sweet glaze that finishes the bars elegantly.
- Milk, 1–2 tablespoons: Adjusts glaze consistency for perfect drizzling.
How to Make Cherry Pie Bars Recipe
Step 1: Prepare Your Oven and Pan
Start by setting your oven to 350°F (175°C). Grease a 9×13-inch baking dish or line it with parchment paper to ensure your bars come out cleanly and maintain their perfect shape. This simple step saves you from any sticky situations later!
Step 2: Cream Butter and Sugar
In a large bowl, beat together the softened butter and granulated sugar until the mixture becomes light and fluffy. This technique helps incorporate air, which makes the bars tender and gives them that wonderful melt-in-your-mouth quality.
Step 3: Add Eggs and Extracts
Beat in the eggs one at a time, making sure each is fully combined before adding the next. Then stir in both the vanilla and almond extracts. These extracts infuse the dough with a warm, fragrant sweetness that perfectly complements the cherry filling.
Step 4: Combine Dry Ingredients
In a separate bowl, whisk together the flour and salt. Gradually incorporate the dry ingredients into the wet mixture until fully combined into a soft, smooth dough. Don’t overmix here—just blend to start building your bar’s delicious base.
Step 5: Layer the Dough and Cherry Filling
Spread about two-thirds of the dough evenly into the prepared baking dish, pressing it down gently. Pour the cherry pie filling evenly over this base layer. Then, dollop the remaining dough by spoonfuls across the top, leaving some gaps where the cherries peek through.
Step 6: Bake to Golden Perfection
Bake in your preheated oven for 35 to 40 minutes, or until the top of the bars turns a lovely light golden color and feels set to the touch. Let the bars cool completely before adding the finishing glaze, as this helps everything set nicely for clean slices.
Step 7: Prepare the Almond Glaze and Drizzle
Whisk the powdered sugar, milk, and additional almond extract in a small bowl until you achieve a smooth, pourable glaze. Drizzle it over the cooled bars in an attractive pattern to add sweetness and a beautiful glossy finish before cutting and serving.
How to Serve Cherry Pie Bars Recipe
Garnishes
For an extra special touch, sprinkle some finely chopped toasted almonds or a dusting of powdered sugar on top. Fresh cherries or a sprig of mint can also add a pop of color, elevating both the look and the flavor.
Side Dishes
Cherry Pie Bars pair wonderfully with a scoop of vanilla ice cream or a dollop of freshly whipped cream for a classic dessert combo. A cup of hot coffee or tea also complements their sweetness, making for a perfect afternoon indulgence.
Creative Ways to Present
Try serving these bars on a rustic wooden board with a few fresh cherries and edible flowers for a charming presentation at your next gathering. You could also cut them into small bite-sized squares and arrange on a tiered dessert stand to impress your guests.
Make Ahead and Storage
Storing Leftovers
Leftover Cherry Pie Bars store beautifully in an airtight container in the refrigerator for up to 5 days. This means you can enjoy a delicious treat anytime without fussing with fresh baking every time.
Freezing
If you want to keep these bars longer, wrap them tightly in plastic wrap and store in a freezer-safe bag or container for up to 3 months. Thaw them overnight in the fridge before serving to maintain their texture and flavor.
Reheating
Warm leftover bars gently in the microwave for 15 to 20 seconds or in a low-temperature oven until just heated through. This revives their soft texture and brings back the enticing aroma of fresh-baked cherry goodness.
FAQs
Can I use fresh cherries instead of canned pie filling?
Absolutely! Fresh cherries can be used but you’ll need to cook them down into a thick filling with sugar and a thickener like cornstarch to get that perfect consistency. The canned filling saves time and delivers consistent results.
What can I substitute for almond extract?
If you don’t have almond extract, vanilla extract alone works fine. You can also experiment with a hint of lemon zest for a bright twist, though it will change the flavor profile.
Can I make these bars gluten-free?
Yes, use a gluten-free all-purpose flour blend that measures cup-for-cup. Be sure the flour contains xanthan gum or add it separately to help with structure.
How thick should I spread the cherry filling?
Spread the cherry pie filling evenly but avoid piling it too thick. About a quarter to half an inch layer works best to balance the dough and prevent sogginess.
Is it necessary to chill the bars before cutting?
While not required, chilling the bars for an hour or two helps the glaze set firmly and the bars slice more cleanly, especially if you prefer neat presentation.
Final Thoughts
There’s nothing quite like biting into these Cherry Pie Bars Recipe goodies to bring a bit of homemade joy to your day. With their perfect blend of buttery crust, vibrant cherry filling, and sweet almond glaze, they truly make every bite feel special. I can’t wait for you to try this recipe and see how quickly it becomes a beloved staple in your dessert rotation!
Print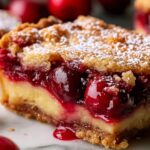
Cherry Pie Bars Recipe
- Prep Time: 15 minutes
- Cook Time: 40 minutes
- Total Time: 55 minutes
- Yield: 24 bars
- Category: Dessert
- Method: Baking
- Cuisine: American
- Diet: Vegetarian
Description
Delight in these luscious Cherry Pie Bars featuring a buttery crust, a generous layer of sweet cherry pie filling, and a smooth almond-glazed topping. Perfect for an easy-to-make American-style dessert that serves up to 24 bars, ideal for gatherings or a sweet treat any time.
Ingredients
Crust and Dough
- 1 cup unsalted butter, softened
- 1 3/4 cups granulated sugar
- 4 large eggs
- 1 teaspoon vanilla extract
- 1/4 teaspoon almond extract
- 3 cups all-purpose flour
- 1/2 teaspoon salt
Filling
- 1 (21-ounce) can cherry pie filling
Glaze
- 1 cup powdered sugar
- 1–2 tablespoons milk
- 1/4 teaspoon almond extract
Instructions
- Preheat Oven and Prepare Pan. Preheat your oven to 350°F (175°C). Grease a 9×13-inch baking dish thoroughly or line it with parchment paper to prevent sticking.
- Cream Butter and Sugar. In a large bowl, use a mixer to cream the softened butter and granulated sugar together until the mixture becomes light and fluffy, which will provide a tender base for the bars.
- Add Eggs and Flavors. Incorporate the eggs one at a time, beating well after each addition to ensure a smooth batter. Stir in the vanilla and almond extracts to give the dough a fragrant flavor.
- Combine Dry Ingredients. In a separate bowl, whisk together the all-purpose flour and salt, then gradually add this dry mix to the wet ingredients, mixing until fully combined to form a dough.
- Assemble the Bars. Spread approximately two-thirds of the dough evenly into the prepared baking dish, creating a solid base. Spread the cherry pie filling evenly over this layer. Then, drop the remaining dough by spoonfuls evenly over the cherry filling to create a rustic topping.
- Bake. Place the baking dish in the preheated oven and bake for 35 to 40 minutes or until the top is lightly golden and set, indicating the bars are cooked through.
- Cool. Remove the dish from the oven and let the bars cool completely at room temperature to allow them to set properly.
- Prepare and Drizzle Glaze. In a small bowl, whisk together the powdered sugar, milk, and almond extract until smooth. Drizzle this glaze over the cooled bars for a sweet finishing touch.
- Slice and Serve. Once glazed, slice the bars into 24 pieces and serve as a delightful dessert or snack.
Notes
- Feel free to substitute the cherry pie filling with other fruit fillings such as blueberry or apple for variety.
- Chilling the bars before slicing will yield a crisper texture that holds together better.
- These bars can be stored in the refrigerator for up to 5 days, maintaining their freshness.