“`html
If you’re looking for a festive, fun, and absolutely delicious dessert to brighten up your springtime gatherings, this Easter Dirt Cups Recipe is the perfect treat. Bursting with creamy pudding, sweet Cool Whip, crunchy Oreo “soil,” and colorful candy accents, these cups are like little edible Easter gardens that bring joy to both kids and adults alike. They’re simple to make, wonderfully whimsical, and guaranteed to be a hit at any celebration.
Ingredients You’ll Need
Gathering the ingredients for this Easter Dirt Cups Recipe is delightfully straightforward, and each one plays a crucial role in building layers of flavor, texture, and color. From the smooth vanilla pudding to the crisp Oreo crumbs and vibrant coconut, every element adds a special touch to your dessert.
- Vanilla instant pudding mix: Provides the creamy, sweet base that’s easy to whip up in minutes.
- Cold milk: Perfect for mixing with the pudding for that silky, smooth texture.
- Cool Whip (thawed): Adds airy lightness and fluffiness to the pudding layers.
- Oreo cookies (finely crushed, filling removed): Give that signature “dirt” crunch and chocolatey contrast.
- Food coloring (various colors): Essential for creating the fun, pastel-hued layers that scream springtime joy.
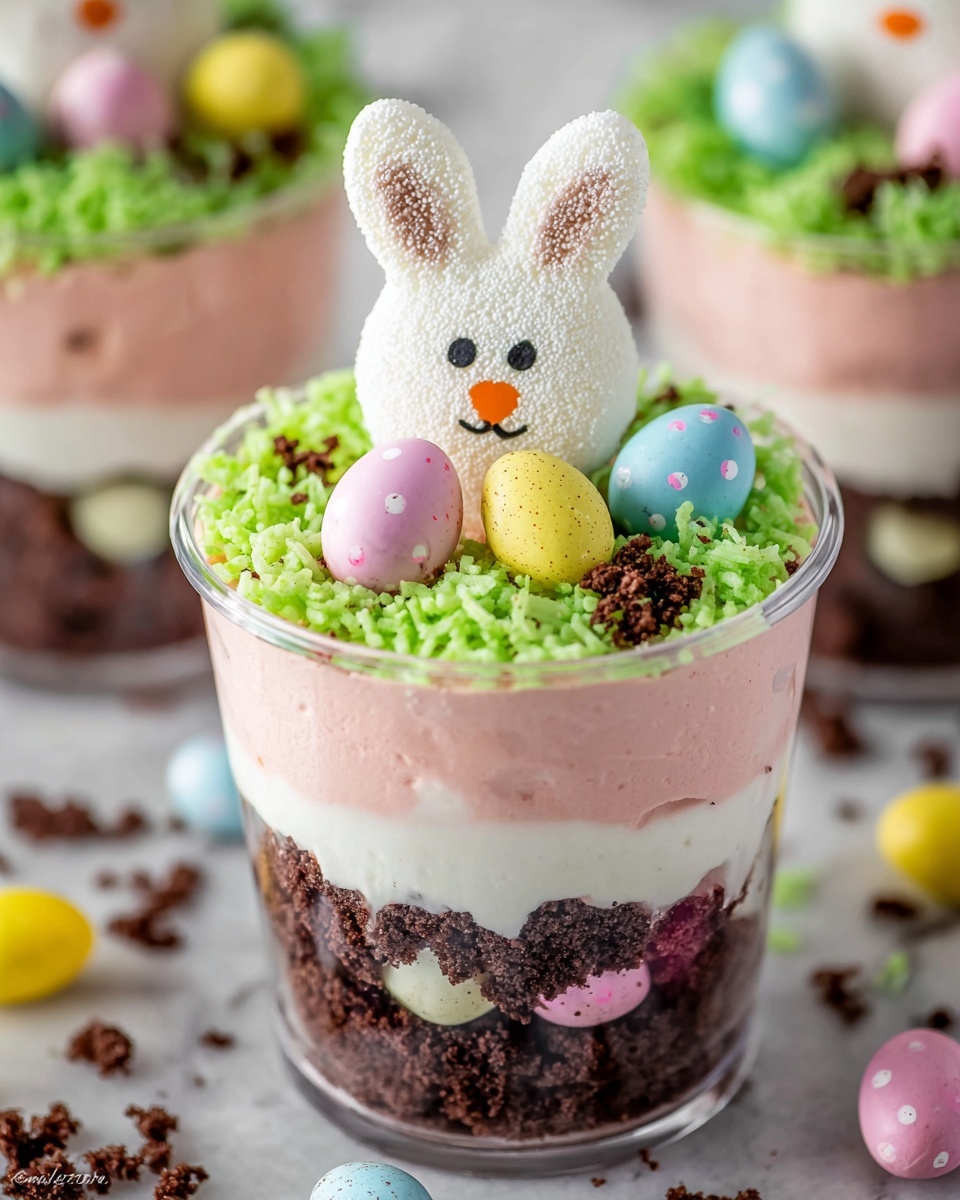
- Shredded coconut: A special ingredient for coloring and sprinkling on top to mimic grassy patches.
- Candy eggs: Brighten the cups with pops of color and a sweet surprise.
- Peeps marshmallow chicks or bunnies: The iconic Easter classic that adds whimsy and charm.
How to Make Easter Dirt Cups Recipe
Step 1: Prepare the Vanilla Pudding
Start by whisking together the vanilla instant pudding mix with cold milk for approximately two minutes until smooth and slightly thickened. Let it stand for five minutes to fully set, creating that luscious, creamy base for your cups.
Step 2: Add Color to Your Pudding
Divide the pudding evenly into two separate bowls. This is where the magic begins — add different food coloring drops to each bowl to craft your favorite vibrant Easter shades, such as a pastel purple and a soft pink. This step makes the dessert visually exciting and fits perfectly with the festive theme.
Step 3: Fold in the Cool Whip
Gently fold the thawed Cool Whip into each colored pudding bowl with care. This lightens the pudding, giving it a fluffy, airy texture that contrasts nicely with the crunchy Oreo crumbs in the layers.
Step 4: Layer the Oreo “Dirt”
In your chosen serving cups or mason jars, add about a tablespoon of finely crushed Oreo cookies at the bottom. This will be the base “soil” layer — the texture here adds a delightful crunch that complements the creamy pudding.
Step 5: Add the First Pudding Layer
Spoon in a layer of one of the colored pudding mixtures over the Oreo crumbs. This starts building the vibrant look and introduces the creamy contrast to the chocolate “dirt.”
Step 6: Repeat the Layers
Alternate between layering the opposite colored pudding and crushed Oreos until you reach the top of each cup, ending with a final layer of Oreo crumbs. This visual layering makes the cups almost too pretty to eat, but trust me, you’ll want to dive right in.
Step 7: Chill to Set
Place your assembled Easter Dirt Cups into the refrigerator for at least one hour. This chilling time helps the pudding to firm up a bit and lets the flavors meld together perfectly.
Step 8: Color the Coconut Grass
Take shredded coconut and drop it into a container with a lid along with a few drops of food coloring and a splash of water. Shake it well until the coconut picks up the lovely color. This dyed coconut will serve as the grass-like topping, adding a fun texture and colorful finish.
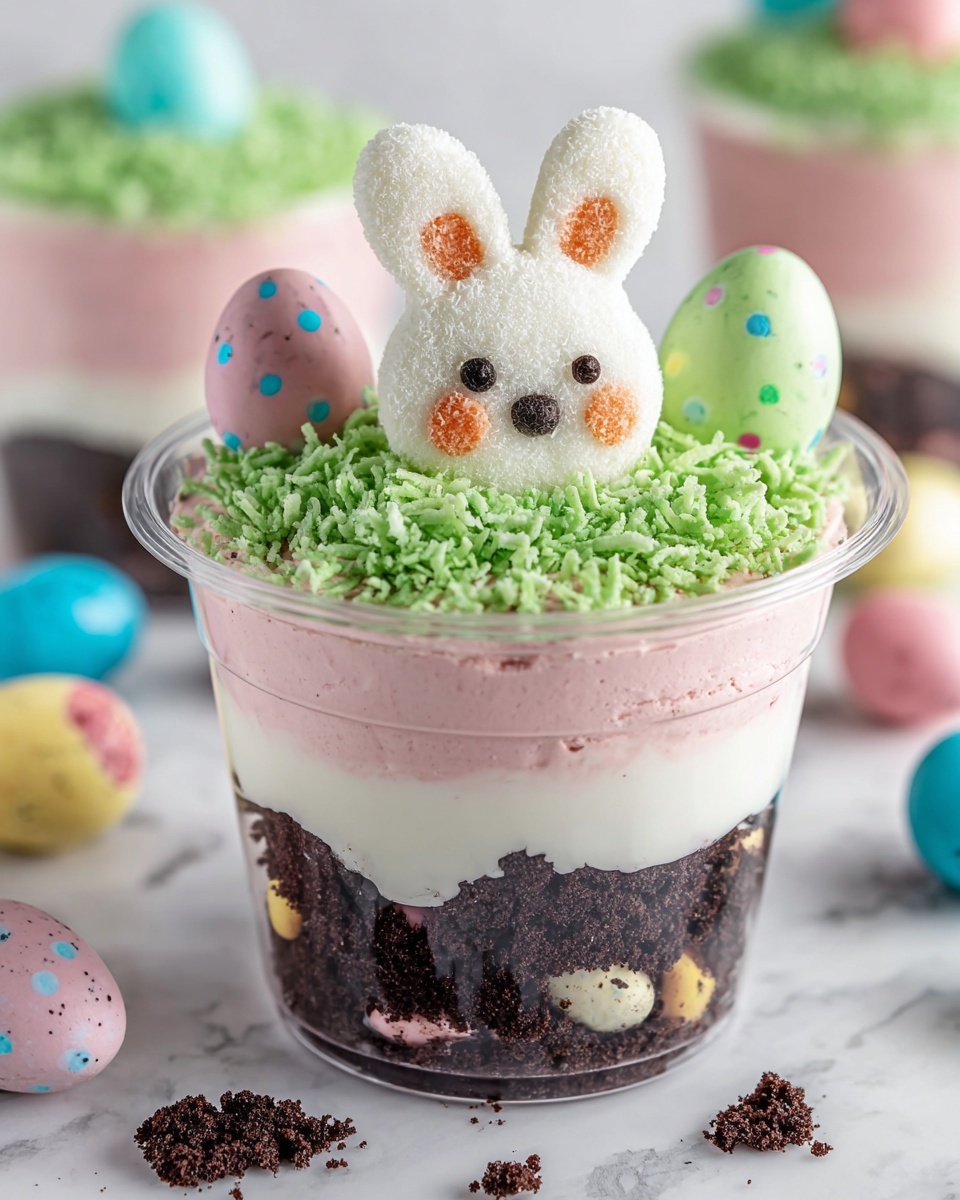
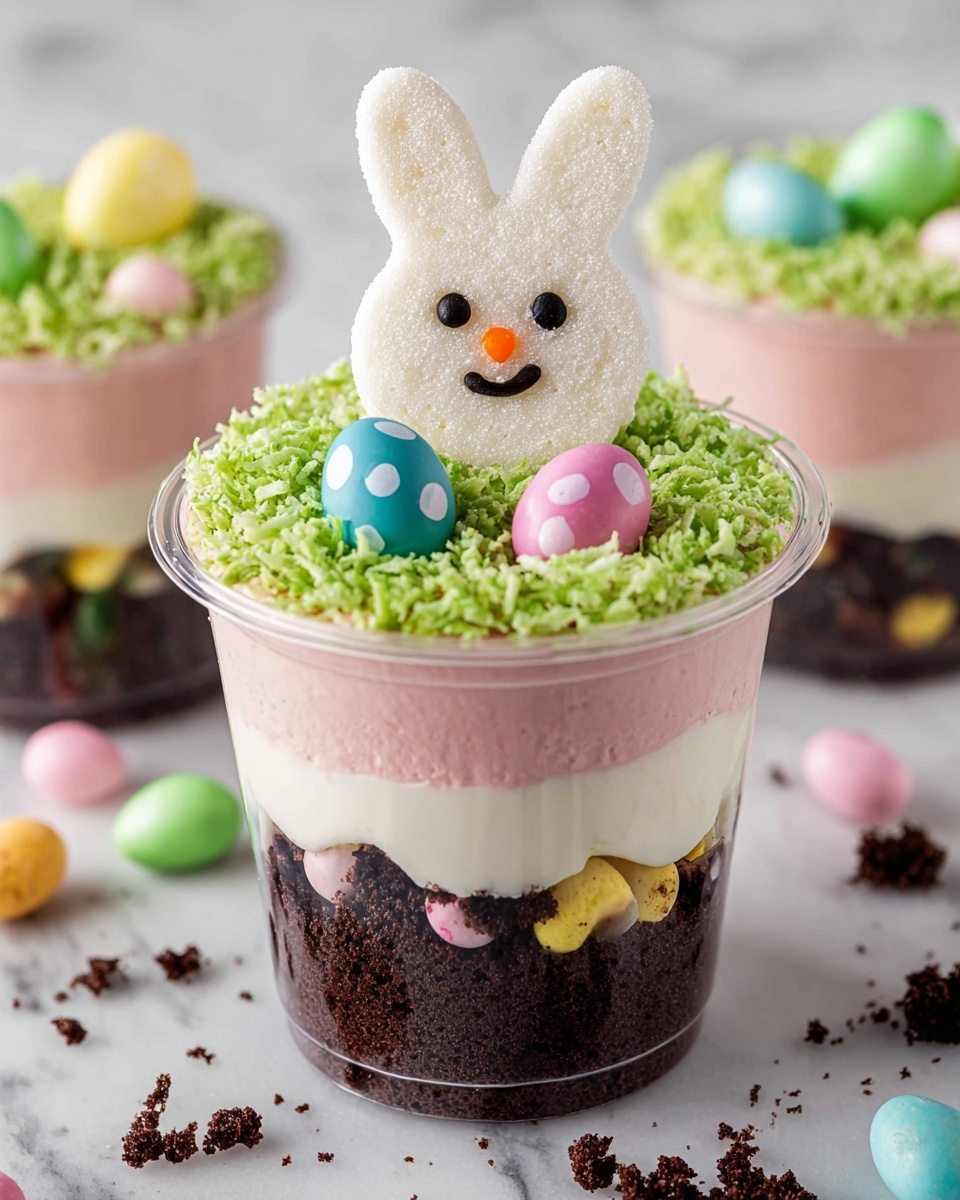
Step 9: Decorate and Finish
Just before serving, sprinkle the colored coconut on top of each cup, then add candy eggs and Peeps marshmallow decorations. These final touches transform the dirt cups into charming little Easter scenes full of personality and fun.
How to Serve Easter Dirt Cups Recipe
Garnishes
Beyond candy eggs and Peeps, consider adding edible flowers, mini chocolate bunnies, or even pastel sprinkles to personalize each cup. These garnishes not only elevate presentation but also add extra layers of flavor and texture that guests will love.
Side Dishes
Easter Dirt Cups pair beautifully with light, fresh sides such as fruit salads or lemon bars. Their creamy richness contrasts well with tangy or crisp accompaniments, creating a balanced, celebratory spread perfect for any Easter brunch or party.
Creative Ways to Present
Serve these dirt cups in clear mason jars, small terra cotta pots, or even plastic flower pots to play up the garden theme. Adding little wooden spoons tied with pastel ribbons or tags with fun bunny-themed messages can make your presentation feel extra special and festive.
Make Ahead and Storage
Storing Leftovers
If you have any leftovers — though unlikely! — keep them covered in the refrigerator. Stored properly, these cups will hold their fresh taste and texture for up to two days, making them a great make-ahead dessert option for Easter gatherings.
Freezing
Freezing Easter Dirt Cups isn’t recommended as the pudding texture can change upon thawing, resulting in separation or watery layers. It’s best to enjoy these fresh for the creamiest, most delightful experience.
Reheating
Since this is a chilled dessert, reheating isn’t applicable. The dirt cups are best served cold and fresh to maintain their texture and flavor.
FAQs
Can I use homemade pudding instead of instant mix?
Absolutely! Homemade pudding can work wonderfully, just make sure it’s chilled and thick enough to hold the shape in layers. The instant mix, however, offers the convenience and consistent texture that makes this recipe quick and easy.
What if I don’t have Oreo cookies?
You can substitute with any chocolate sandwich cookies or even crushed chocolate wafers. The key is to have a crunchy, chocolatey element to mimic the dirt layer.
Can I make the pudding layers without food coloring?
Yes, you can leave the pudding plain if you prefer. The vibrant colors add to the festive spirit, but the dessert will still taste delicious with just the vanilla layers.
Is there a dairy-free option for this recipe?
Definitely! Use a dairy-free pudding mix and a non-dairy whipped topping like coconut whipped cream. Just check that the Oreos or cookie substitute you use are also dairy free.
How far ahead can I prepare Easter Dirt Cups?
You can prepare the pudding and cookie layers up to a day in advance and keep them refrigerated. Add the colorful coconut and candy decorations just before serving to keep everything looking fresh and vibrant.
Final Thoughts
If you want to add a touch of magic and sweetness to your Easter celebration, give this Easter Dirt Cups Recipe a whirl. It’s playful, tasty, and brings everyone around the table together with smiles and happy taste buds. Once you try it, these charming little cups will definitely become a seasonal favorite you’ll want to make year after year.
“`
Print
Easter Dirt Cups Recipe
- Prep Time: 20 minutes
- Cook Time: 0 minutes
- Total Time: 1 hour 20 minutes
- Yield: 18 dirt cups
- Category: Dessert
- Method: No-Cook
- Cuisine: American
Description
These Easter Dirt Cups are a fun and festive no-bake dessert perfect for spring celebrations. Layers of colorful vanilla pudding mixed with Cool Whip are alternated with crushed Oreo cookies to mimic dirt, then topped with vibrant colored coconut and candy eggs for a playful garden look.
Ingredients
Pudding Base
- 1 package (3.9 oz.) vanilla instant pudding mix
- 2 cups cold milk
- 1 container (8 oz.) Cool Whip, thawed
Chocolate ‘Dirt’ Layers
- 1 package Oreo cookies (finely crushed, filling removed)
Decorations
- Food coloring (various colors)
- Shredded coconut
- Candy eggs
- Peeps
Instructions
- Prepare Pudding: In a medium bowl, whisk together the vanilla instant pudding mix and cold milk vigorously for about 2 minutes. Allow the mixture to sit and set for 5 minutes.
- Color the Pudding: Divide the set vanilla pudding into two separate bowls. Add different food coloring drops to each bowl to create your desired colors such as purple and pink, and mix gently to combine.
- Fold in Cool Whip: Gently fold the thawed Cool Whip into each colored pudding bowl until fully incorporated and smooth, creating light and fluffy pudding mixtures.
- Layer Oreo Cookies: Spoon approximately one tablespoon of finely crushed Oreo cookies (with filling removed) into the bottom of each mason jar or serving cup as the dirt base.
- First Pudding Layer: Add a layer of one colored pudding mixture over the crushed Oreos in each cup.
- Build Layers: Alternate layers of crushed Oreo cookies and the colored pudding mixtures, repeating until nearly full, finishing with a layer of crushed Oreos on top.
- Chill to Set: Place the cups in the refrigerator for at least 1 hour to allow all layers to firm up and meld together.
- Color the Coconut: Place shredded coconut in a lidded container. Add a few drops of food coloring along with a small amount of water, close the lid tightly, and shake vigorously until the coconut is evenly colored.
- Garnish and Serve: Just before serving, top each dirt cup with the colored shredded coconut, candy eggs, and Peeps for a festive springtime touch.
Notes
- For best results, use cold milk to ensure the pudding sets properly.
- Remove Oreo fillings before crushing to avoid a creamier texture that can alter the dirt effect.
- You can customize the colors of the pudding and the coconut to match your party theme.
- If you don’t have Peeps, other small candies or gummy worms make excellent substitutes.
- These dirt cups are best served chilled and consumed within one day for freshness.