If you have ever wished you could recreate those irresistible cookie classics right in your own kitchen, then this Homemade Thin Mints Recipe is your new best friend. These cookies capture the perfect combination of rich chocolate, refreshing peppermint, and a tender yet crisp texture that makes every bite feel like a mini celebration. Trust me, once you start making these delightful treats, you will understand why they’re so beloved and find yourself reaching for them again and again.
Ingredients You’ll Need
Every component in this Homemade Thin Mints Recipe is simple but essential. Each ingredient contributes uniquely to the final taste, texture, and color, making the process straightforward yet rewarding.
- 3/4 cup butter, unsalted, softened: Adds richness and helps achieve that tender bite.
- 1 cup sugar: Sweetens the dough and balances the cocoa’s bitterness.
- 1 large egg: Binds ingredients and provides moisture for the perfect texture.
- 1 tsp pure vanilla extract: Enhances the overall flavor depth.
- 1/2 tsp pure peppermint extract: Delivers the signature minty freshness.
- 1 1/2 cup flour: Forms the sturdy structure for the cookies.
- 3/4 cup Hershey cocoa powder: Infuses a rich chocolate essence.
- 1 tsp baking powder: Helps the cookies rise just enough for a soft center.
- 1/4 tsp kosher salt: Balances sweetness and enhances flavors.
- 2 cup semi-sweet chocolate chips: Creates the luscious chocolate coating.
- 1/2 cup heavy whipping cream: Used to make a smooth, luxurious ganache.
- 1/4 tsp pure peppermint extract: Boosts the mint flavor in the chocolate coating.
How to Make Homemade Thin Mints Recipe
Step 1: Prepare the Dough
Start by creaming the softened butter and sugar using a standing mixer until the blend is light and fluffy—this is key for that tender crumb. Beat in the egg, vanilla, and peppermint extracts until everything is well combined and smooth. In a separate bowl, whisk together the flour, cocoa powder, baking powder, and salt to ensure even distribution. Gradually mix the dry ingredients into the wet mixture until you get a soft, cohesive dough. Roll this dough out between two silicone baking mats to a half-inch thickness, which helps keep the dough from sticking and makes rolling easy. Pop it into the fridge for an hour—that chill time helps the dough firm up for cleaner cookie cuts. Meanwhile, preheat your oven to 350 degrees and line your cookie sheets with parchment paper or silicone mats for an easy non-stick surface.
Step 2: Cut and Bake the Cookies
After chilling, take your dough out and use a 2-inch round cookie cutter to cut 24 perfect rounds. Arrange them on the prepared baking sheets with a little space between each so they bake evenly. Bake for 10-12 minutes until the edges are firm but the centers still feel soft—this balance gives thin mints their signature texture. While the cookies cool, it’s time to whip up the delicious chocolate coating that will make them truly irresistible.
Step 3: Prepare the Chocolate Coating
Heat the heavy cream gently in a small pot until it just simmers—avoid boiling to keep the chocolate silky. Pour the hot cream over the semi-sweet chocolate chips in a medium bowl, letting it sit for a minute to soften the chocolate. Then whisk until the mixture is smooth and glossy, folding in the extra peppermint extract for a burst of minty flavor. This luscious ganache is the magic behind the smooth, shiny shell of these homemade treats.
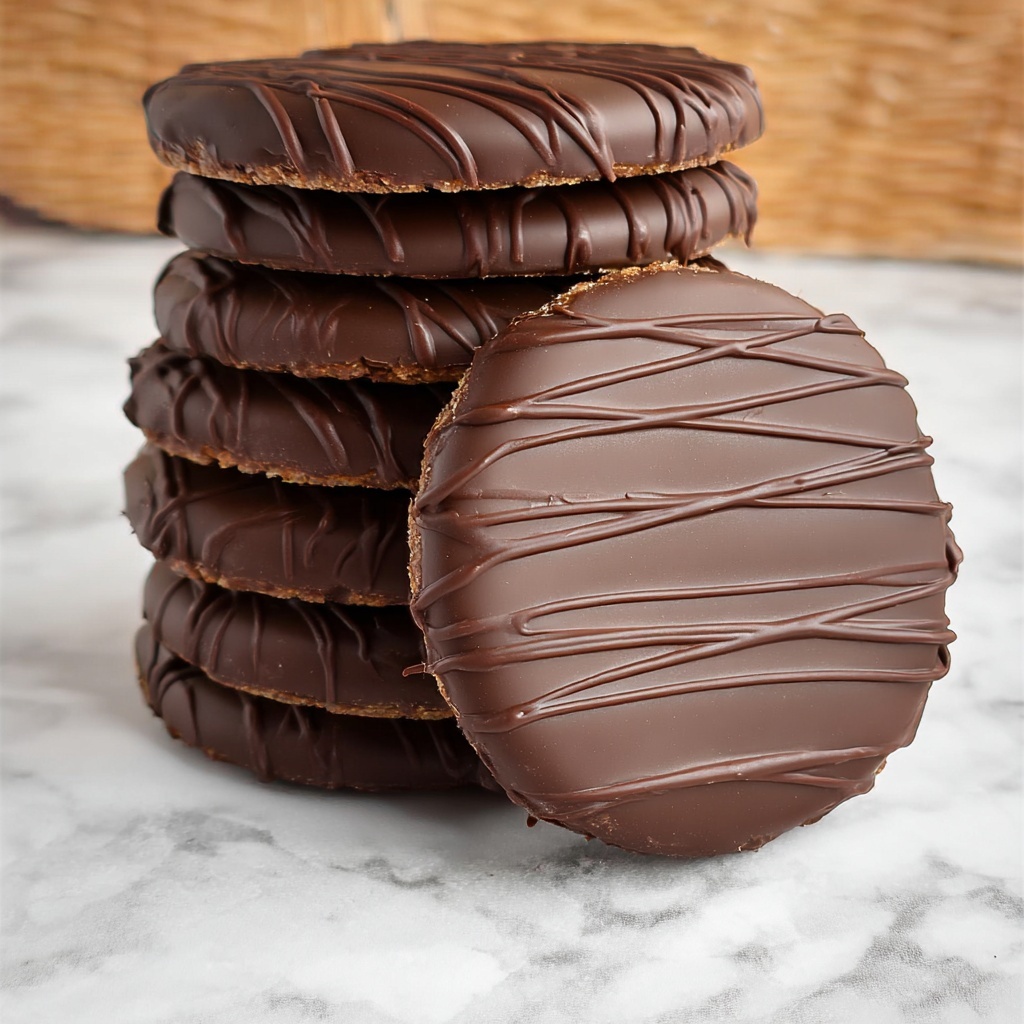
Step 4: Dip and Decorate
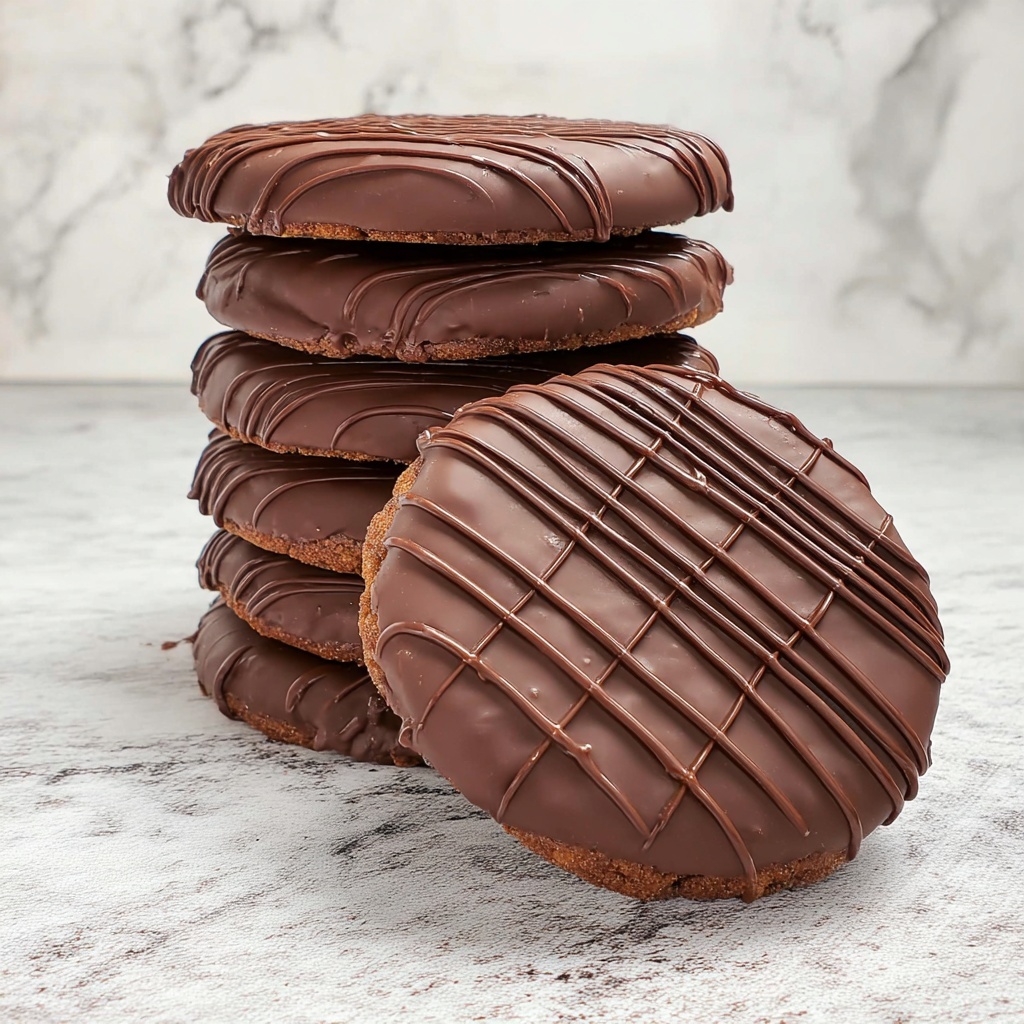
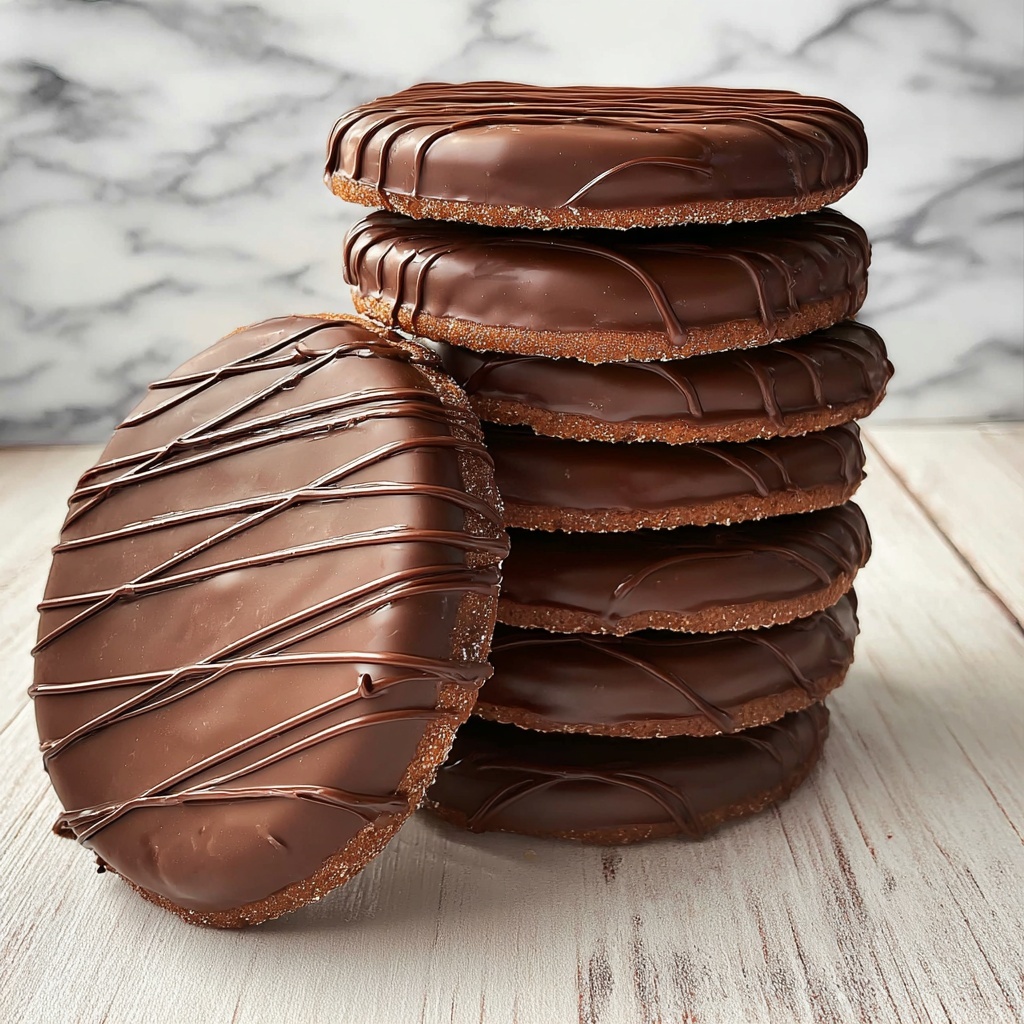
Grab one cookie at a time with a fork—this helps you easily lift it without losing any of the beautiful coating. Dip each cookie into the chocolate, gently tapping the side of the bowl to remove excess chocolate and achieve a smooth finish. Lay the dipped cookies on a baking sheet lined with a silicone mat and repeat with the remaining cookies. Once all are dipped, pour the leftover chocolate into a disposable piping bag and snip the tip off to drizzle pretty lines across the cookies. Let the chocolate harden fully before you break out a napkin because these are meant to be enjoyed, not daintily handled!
How to Serve Homemade Thin Mints Recipe
Garnishes
To elevate your Homemade Thin Mints Recipe presentation, consider sprinkling a few crushed peppermint candies or finely chopped fresh mint leaves around the serving platter. This adds a festive crunch and a lovely pop of color that hints at what’s to come with each bite. A light dusting of cocoa powder can also complement the rich chocolate exterior if you want an extra touch of sophistication.
Side Dishes
These cookies are brilliant on their own but pairing them with a glass of cold milk or a robust cup of peppermint tea really highlights their flavor. You could also serve them alongside a scoop of vanilla ice cream for a simple yet impressive dessert combo. The cool creaminess contrasts beautifully with the mint chocolate crunch, making it a crowd-pleaser at any gathering.
Creative Ways to Present
For a party or gift, stack your Homemade Thin Mints Recipe cookies in a decorative jar or a rustic tin, tied with a festive ribbon. You can also sandwich a little peppermint buttercream between two cookies for a fun twist. Wrapping individual cookies in clear cellophane with a personalized tag adds a charming homemade touch that friends and family will adore.
Make Ahead and Storage
Storing Leftovers
Keep your cookies fresh by storing them in an airtight container at room temperature. This will preserve their crisp edges and soft centers for up to a week, so you can enjoy them without worry. Avoid stacking too many on top of each other before the chocolate coating sets to maintain their smooth finish.
Freezing
If you want to keep your Homemade Thin Mints Recipe for longer, freezing is your friend. Lay the cookies flat on a baking sheet to freeze them individually before transferring to a freezer-safe container or bag. They’ll stay delicious for up to three months. When you’re ready, thaw them at room temperature to bring back their tender texture.
Reheating
Generally, these minty beauties are best enjoyed at room temperature, but if you crave a warm treat, pop them in the oven for a few minutes at 300 degrees. This will soften the chocolate slightly without melting it completely. Avoid microwaving since it can alter the texture and gloss of the chocolate coating.
FAQs
Can I substitute peppermint extract with something else?
While peppermint extract provides that iconic minty flavor, you could try using spearmint extract or even crushed fresh mint if you want a milder or different mint profile. Just be cautious with the amounts since the potency varies.
Are these cookies gluten-free?
This recipe uses all-purpose flour, which contains gluten. However, you can experiment with a gluten-free flour blend that measures like all-purpose flour for a similar texture, though slight differences may occur.
Can I use milk chocolate instead of semi-sweet chocolate chips?
Absolutely! Milk chocolate will make the coating sweeter and creamier. It’s a great choice if you prefer a less intense chocolate flavor, but keep in mind it might be softer and less glossy.
How thin should I roll the dough?
Rolling the dough to about 1/2 inch thickness is perfect since it ensures the cookies bake evenly while still being tender and not too fragile. Thinner dough can lead to crispier cookies, which might break more easily when dipped.
Why do I need to chill the dough before baking?
Chilling firms up the dough, which helps the cookies keep their shape and prevents spreading too much during baking. It also enhances the flavors and makes cutting out the cookie rounds much easier.
Final Thoughts
If you love mint and chocolate combos, this Homemade Thin Mints Recipe is a total game-changer. The process is fun, the ingredients are simple, and the results are absolutely delicious. Don’t be surprised if these cookies disappear quickly because once they’re on the table, they’re going to become your family’s new favorite tradition. Treat yourself to this little slice of minty joy—you deserve it!
Print
Homemade Thin Mints Recipe
- Prep Time: 10 minutes
- Cook Time: 12 minutes
- Total Time: 1 hour 22 minutes
- Yield: 24 cookies
- Category: Dessert
- Method: Baking
- Cuisine: American
Description
Homemade Thin Mints are a delicious, chocolatey mint cookie that perfectly blends rich cocoa and refreshing peppermint flavors. These crispy yet tender cookies are coated in a smooth peppermint-chocolate ganache, making them a delightful treat for any occasion, especially during the holidays.
Ingredients
Cookie Dough
- 3/4 cup unsalted butter, softened
- 1 cup sugar
- 1 large egg
- 1 tsp pure vanilla extract
- 1/2 tsp pure peppermint extract
- 1 1/2 cups all-purpose flour
- 3/4 cup Hershey’s cocoa powder
- 1 tsp baking powder
- 1/4 tsp kosher salt
Chocolate Coating
- 2 cups semi-sweet chocolate chips
- 1/2 cup heavy whipping cream
- 1/4 tsp pure peppermint extract
Instructions
- Prepare the Dough: Using a standing mixer, cream the softened butter and sugar together until light and fluffy. Beat in the egg, vanilla extract, and peppermint extract until the mixture is combined and smooth. In a separate medium bowl, whisk together the flour, cocoa powder, baking powder, and salt. Gradually add the dry ingredients into the wet mixture until a soft dough forms. Roll the dough out to ½-inch thickness between two silicone baking mats and chill in the refrigerator for one hour. Meanwhile, preheat your oven to 350°F (175°C) and line two baking sheets with parchment paper or silicone baking mats.
- Cut and Bake Cookies: Using a 2-inch round cookie cutter, cut out 24 cookie rounds from the chilled dough. Arrange the cookies on the prepared baking sheets spaced apart. Bake them in the preheated oven for 10-12 minutes or until the edges are firm but the centers remain soft. After baking, allow the cookies to cool completely before coating.
- Make Chocolate Coating: In a small pot, gently bring the heavy cream to a simmer. Pour the hot cream over the semi-sweet chocolate chips placed in a medium heatproof bowl. Let it sit for one minute to melt the chocolate, then whisk until smooth and glossy. Stir in the peppermint extract to infuse the coating with fresh mint flavor.
- Dip the Cookies: Using a fork to lift each cookie, dip them one at a time into the chocolate coating, ensuring they are evenly covered. Lightly tap the side of the bowl to remove any excess chocolate and create a smooth coating. Place the dipped cookies onto a cookie sheet lined with a silicone baking mat.
- Drizzle and Set: After dipping all cookies, transfer any remaining chocolate into a disposable piping bag or a plastic bag with a small corner cut off. Drizzle the chocolate over the coated cookies in a decorative pattern. Allow the chocolate to fully harden at room temperature before serving or storing.
Notes
- For a stronger mint flavor, you can add a little more peppermint extract to the dough or coating, but avoid overdoing it to prevent bitterness.
- Make sure the butter is softened, not melted, for the best texture in the dough.
- Chilling the dough helps keep the cookies from spreading too much during baking, ensuring a crisp edge and tender center.
- If the chocolate coating is too thick, gently warm the ganache again to keep it smooth for dipping.
- Store the Thin Mints in an airtight container at room temperature for up to a week or freeze for longer storage.