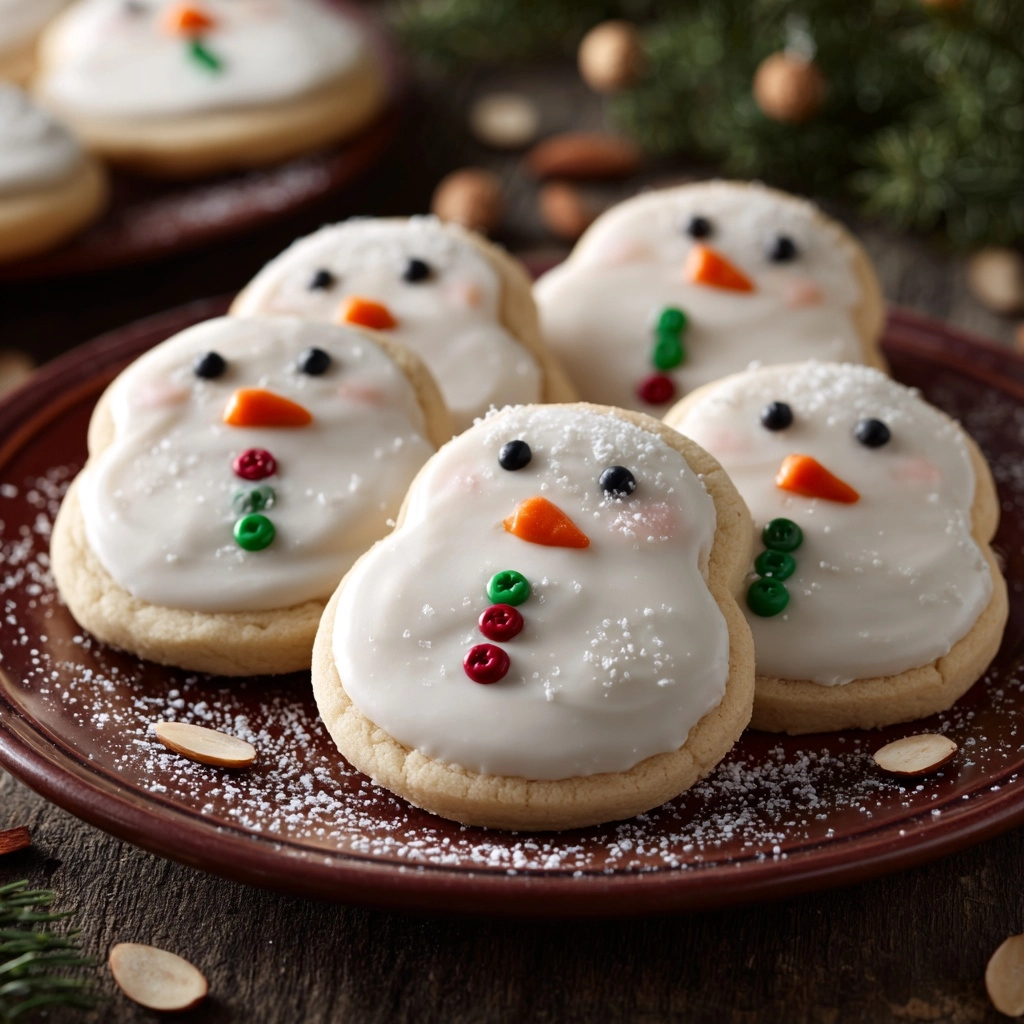
Get ready to unleash your inner cookie artist with this delightfully whimsical Melted Snowman Cookies Recipe! These irresistible treats combine classic sugar cookies, gooey marshmallows, and playful decorations to create a batch of edible snowmen that are as fun to make as they are to eat. Whether you’re baking for a family holiday gathering or just want to bring a little frosty cheer to a winter afternoon, this recipe is endlessly customizable and guaranteed to melt hearts… before they melt in your mouth!
Ingredients You’ll Need
-
Sugar Cookies:
- 1 batch of sugar cookies (about 24 cookies)
Decorations:
- 24 large marshmallows
- 2 cups powdered sugar
- 2–3 tablespoons milk
- 1/2 teaspoon vanilla extract
- black decorating gel
- orange decorating gel or mini orange candies (for noses)
- mini chocolate chips or candy eyes
- colored sprinkles or candy scarves (optional)
How to Make Melted Snowman Cookies Recipe
Step 1: Bake and Cool the Cookies
Start with a scrumptious batch of sugar cookies—this can be your favorite homemade recipe or simply grab some refrigerated dough for convenience. Bake them off until just golden around the edges and let them cool completely. Cooling is key as it prevents the icing from running off or melting, ensuring the perfect base for your snowmen creations.
Step 2: Prepare the Icing
In a medium mixing bowl, whisk together the powdered sugar, milk, and vanilla extract until smooth and creamy. The goal is a thick but spreadable icing—think “melting snow,” not “waterfall”! If it’s too thick, add a splash more milk; too thin, sprinkle in a bit more powdered sugar.
Step 3: Decorate with Icing
Spoon a generous dollop of icing onto the center of each cooled cookie. Use the back of your spoon to spread it outwards in wavy, uneven circles, creating that playful, puddled effect you see when snowmen meet a little sunshine. Don’t stress about perfection—the more irregular the shape, the more adorable your melted snowmen will look!
Step 4: Add Marshmallow Heads
Place one large marshmallow at the edge of each icing pool to form the snowman’s head. For a truly “melty” effect, try microwaving your marshmallows for 5–7 seconds so they soften and slightly slump into the icing. It’s a simple trick that brings a totally delightful, lived-in quality to each cookie!
Step 5: Draw Faces and Features
Now comes the real fun—bringing your snowmen to life! Use black decorating gel to carefully dot on eyes and a smile on each marshmallow, and add an orange gel nose or press in a mini orange candy for that iconic carrot look. Incorporate candy eyes, chocolate chips, or colored sprinkles to design buttons, scarves, or even stick arms. This is a perfect time to invite little helpers into the kitchen—everyone ends up with a unique snowman buddy!
Step 6: Let the Decorations Set
Let your finished Melted Snowman Cookies sit undisturbed for 30 to 60 minutes. This drying time gives the icing a chance to set, ensuring your snowmen stay picture-perfect (at least until snack time). Now, your cookies are ready to serve—or to delight friends and family as a whimsical homemade gift!
How to Serve Melted Snowman Cookies Recipe

Garnishes
For an extra festive touch, try dusting the serving platter with a little sifted powdered sugar “snow” or surround your cookies with shimmering edible glitter. You can also pipe little snowflake shapes alongside the cookies for extra winter flair. Even a handful of mini marshmallows scattered around will make your treat table look joyfully frosty.
Side Dishes
Melted Snowman Cookies Recipe pairs perfectly with cozy mugs of hot cocoa, creamy chai lattes, or a big pot of spiced apple cider. For a dessert party, set out bowls of peppermint bark or chocolate-covered pretzels for snacking variety. These cookies also shine alongside a simple fruit platter to balance all the sweetness.
Creative Ways to Present
For party favors, package each cookie in a cellophane bag with a colorful ribbon and a cheerful note. If you’re serving a crowd, arrange the cookies on a frosty blue or silver tray surrounded by sparkly decorations. You can even create a “decorate your own snowman” station at gatherings, letting everyone unleash their inner artist with extra icing, candies, and sprinkles on hand!
Make Ahead and Storage
Storing Leftovers
Store leftover Melted Snowman Cookies in an airtight container at room temperature for up to 3 days. Place parchment paper between layers to prevent decorations and icing from sticking together. The cookies are best enjoyed fresh, but they’ll stay soft and festive even after a day or two.
Freezing
If you need to make them further in advance, freeze undecorated cookies in a zip-top bag. Thaw and decorate within a day or two of serving for the freshest taste and the sharpest decoration details. While you can technically freeze finished cookies, marshmallows and colored gels sometimes change texture, so fresh decorating is recommended for best results.
Reheating
These cookies don’t need reheating since they’re best enjoyed at room temperature! If you’ve frozen your base cookies, let them thaw at room temp for an hour or so before you decorate. Avoid microwaving decorated cookies as this can melt your hard-earned decorations and make your snowmen extra droopy.
FAQs
Can I use a different cookie base for the Melted Snowman Cookies Recipe?
Absolutely! While sugar cookies are classic, you can swap in gingerbread, shortbread, or even chocolate cookies for a delicious twist. Just make sure you choose a sturdy cookie that can hold all that marshmallow fun and icing.
What’s the best way to get my icing the right consistency?
The icing should be thick but spreadable—start with the lower end of milk, mix well, and add droplets until you reach that “puddle” effect. If you overdo it, add a bit more powdered sugar until you nail that sweet spot.
Can kids help make the Melted Snowman Cookies Recipe?
Kids absolutely love helping! Let them spread the icing, plop on marshmallow heads, and go wild with the decorating gels and candies. Just be ready for some creative snowmen personalities to emerge—there’s no wrong way to decorate!
I want vibrant scarves and hats. What candies work best?
Fruit leather strips, sour gummy belts, or even rainbow licorice ropes make perfect edible scarves. For hats, try mini peanut butter cups or chocolate buttons perched right on top of the marshmallow head.
Is it okay to make these cookies a day ahead?
Definitely! In fact, making Melted Snowman Cookies Recipe a day in advance allows the icing and decorations to set fully, making them easier to package or transport without smudging. Just keep them well covered to maintain freshness.
Final Thoughts
Baking up a batch of the Melted Snowman Cookies Recipe isn’t just about making a dessert—it’s about creating memories and sharing laughs over a plate of sweet, cheerful winter fun. Grab your favorite helpers and jump right in; you’ll end up with adorable cookies, happy faces, and a signature treat everyone will look forward to year after year.
Print
Melted Snowman Cookies Recipe
- Prep Time: 30 minutes
- Cook Time: 10 minutes
- Total Time: 40 minutes
- Yield: 24 cookies
- Category: Dessert
- Method: Baking
- Cuisine: American
- Diet: Vegetarian
Description
These adorable Melted Snowman Cookies are a festive and fun treat perfect for holiday parties and gatherings. With a sugar cookie base, marshmallow snowman heads, and creative decorations, these cookies are sure to bring smiles to everyone’s faces.
Ingredients
Sugar Cookies:
- 1 batch of sugar cookies (about 24 cookies)
Decorations:
- 24 large marshmallows
- 2 cups powdered sugar
- 2–3 tablespoons milk
- 1/2 teaspoon vanilla extract
- black decorating gel
- orange decorating gel or mini orange candies (for noses)
- mini chocolate chips or candy eyes
- colored sprinkles or candy scarves (optional)
Instructions
- Bake the Sugar Cookies: Prepare the sugar cookies according to your favorite recipe or use store-bought dough. Allow them to cool completely.
- Prepare the Icing: In a medium bowl, combine powdered sugar, milk, and vanilla extract to make a thick, spreadable icing.
- Decorate the Cookies: Spread icing on each cookie in an uneven, melting shape. Place a marshmallow on each cookie. Use black gel for eyes and mouth, and orange gel or candy for the nose. Decorate with chocolate chips, candy eyes, or sprinkles for additional details.
- Set and Serve: Let the cookies sit for 30–60 minutes to allow the icing to set before serving.
Notes
- To achieve a melted look, slightly soften the marshmallows in the microwave before placing them on the cookies.
- These cookies are great for holiday parties and are a fun activity for kids.
Nutrition
- Serving Size: 1 cookie
- Calories: 180
- Sugar: 20g
- Sodium: 65mg
- Fat: 6g
- Saturated Fat: 3g
- Unsaturated Fat: 2g
- Trans Fat: 0g
- Carbohydrates: 30g
- Fiber: 0g
- Protein: 1g
- Cholesterol: 15mg