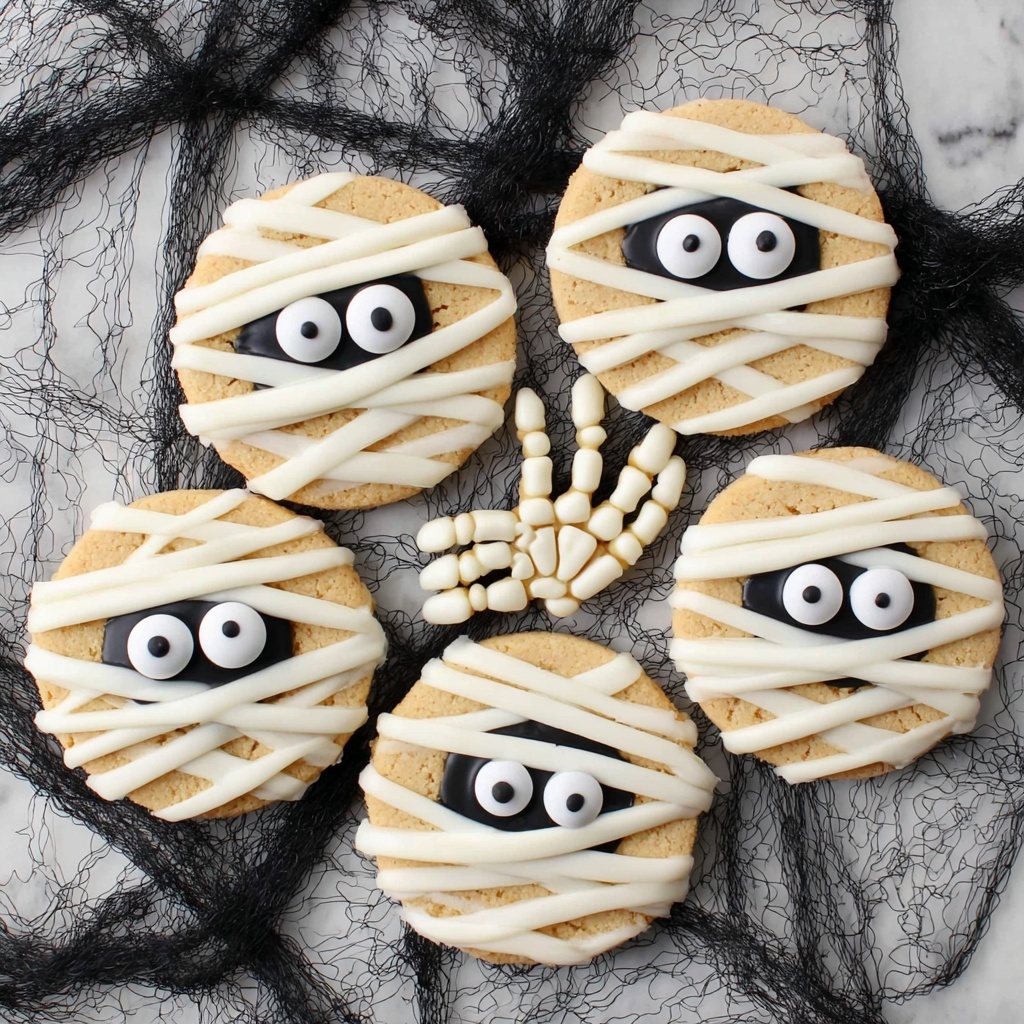
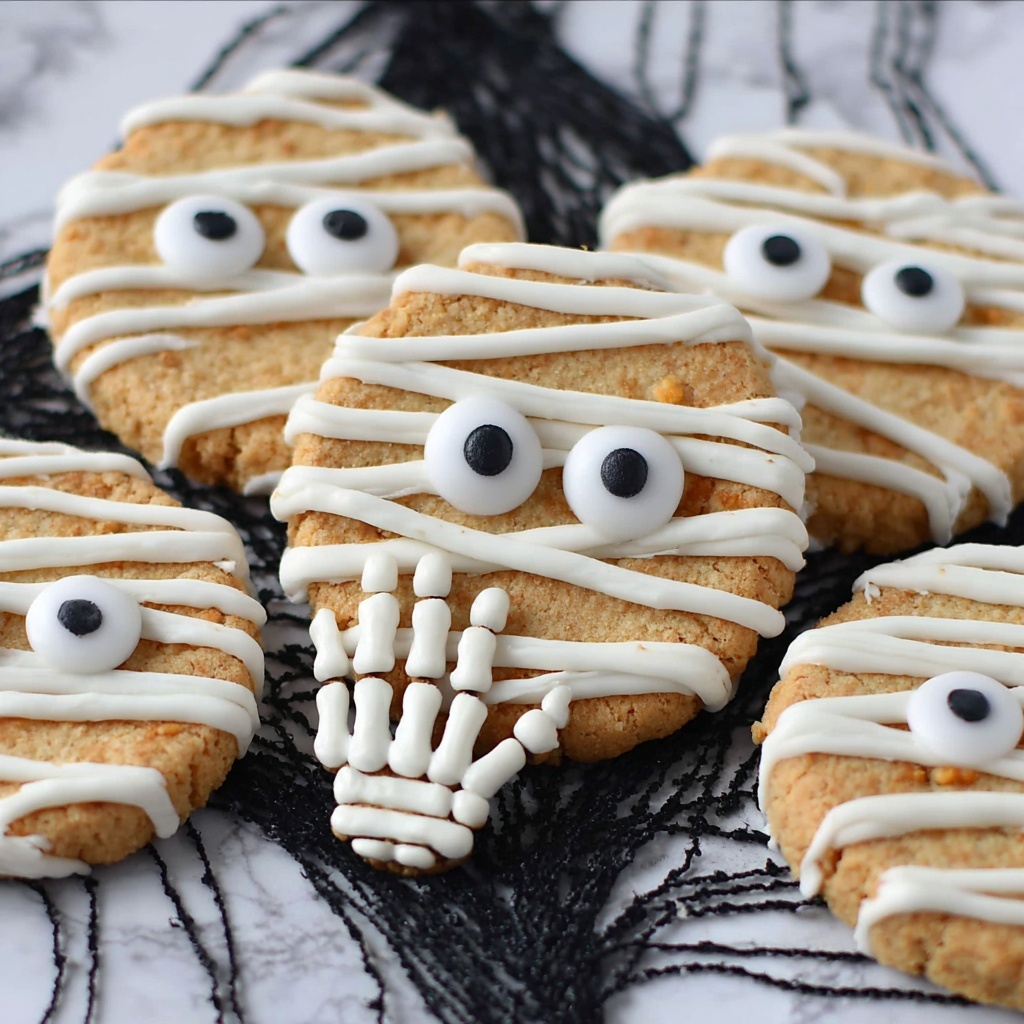
If you’re looking to add an irresistibly fun and festive touch to your cookie game, this Mummy Cookies Recipe is exactly what you need. These adorable treats combine soft, chewy cookie bases with a luxurious maple-buttercream frosting, all decorated to look like little mummies with cute, edible icing eyes. They’re perfect for Halloween or any playful gathering, and the recipe is straightforward enough for bakers of all skill levels to enjoy. Let’s dive into making these delicious little bundles of joy!
Ingredients You’ll Need
These ingredients are simple pantry staples and common baking essentials, each playing a crucial role in giving these cookies their soft texture, rich flavor, and delightful appearance.
- All-purpose flour (3 cups): The backbone of the cookie, providing structure and a tender crumb.
- Baking powder (1 tsp): Helps the cookies rise just enough for a soft puff.
- Baking soda (½ tsp): Adds a slight lift and promotes a chewy texture.
- Cinnamon (1 tsp): Brings warm, cozy spice to complement the sweet maple flavors.
- Kosher salt (½ tsp): Enhances all the flavors and balances the sweetness.
- Unsalted butter, melted (1 cup): Adds richness and moisture for a tender cookie base.
- Light brown sugar, packed (1 ½ cups): Imparts deep molasses flavor and chewiness.
- Maple syrup (⅓ cup): Infuses the cookies with a natural, fragrant sweetness.
- Pure vanilla extract (1 tsp): Elevates the overall flavor with warm, floral notes.
- Large egg (1): Binds ingredients and adds moisture.
- Unsalted butter, softened (1 cup): For the creamy frosting that wraps each mummy.
- Powdered sugar (2 ½ – 3 cups): Sweetens and thickens the frosting for perfect pipability.
- Pure vanilla extract (2 tsp): In the frosting for a luscious, sweet base.
- Heavy whipping cream (4 Tbsp): Gives the frosting a silky, spreadable texture.
- Edible icing eyes (20): The final cute touch that brings the mummies to life.
How to Make Mummy Cookies Recipe
Step 1: Mix the Dry Ingredients
Start by whisking together the flour, baking powder, baking soda, cinnamon, and kosher salt in a large bowl. This ensures the leavening agents and spices are evenly distributed, which is key for consistent flavor and texture across all your cookies.
Step 2: Melt Your Butter
Place one cup of unsalted butter in a microwave-safe bowl and heat until melted. Let it cool just a bit before combining with the sugars to avoid cooking the eggs in later steps.
Step 3: Combine Wet Ingredients
Stir the light brown sugar, maple syrup, and vanilla extract into the melted butter until the mixture is smooth and glossy. Next, add the egg and beat until everything is fully incorporated. This creates a rich base that will make your cookies extra tender and flavorful.
Step 4: Bring it All Together
Gradually add the dry ingredient mixture to the wet ingredients. Use a hand mixer on low speed to mix until just combined. Overmixing can toughen the cookies, so gentle is the way to go here.
Step 5: Chill the Dough
Cover the bowl with plastic wrap and let the dough chill in the refrigerator for 30 minutes. This step is crucial for keeping your cookies from spreading too much while baking, helping them maintain their perfect shape for decorating.
Step 6: Prep and Bake
Preheat your oven to 375 degrees Fahrenheit and line a baking sheet with a silicone mat. Scoop the chilled dough into large balls and space them about 2 inches apart on the sheet. Bake one tray at a time for 10 to 12 minutes. The cookies should puff slightly and have just a hint of beige on the edges. Let them cool on the sheet for five minutes before transferring to a rack to cool completely.
Step 7: Make the Frosting
While the cookies cool, make the frosting by beating the softened butter with powdered sugar, vanilla extract, and heavy whipping cream. Adjust the powdered sugar to get a thick yet spreadable consistency that’s perfect for piping the mummy wraps.
Step 8: Decorate Your Cookies
Use a piping bag or a plastic sandwich bag with the tip cut off to pipe thin lines of frosting across each cookie, resembling the wrapped bandages of a mummy. Finish by placing edible icing eyes on top to give each cookie its spooky, fun character.
How to Serve Mummy Cookies Recipe

Garnishes
For extra flair, you can add tiny dots of red gel icing near the eyes to give the mummies a cheeky pop of color, or dust the cookies very lightly with cinnamon sugar for a gentle sparkle and flavor boost.
Side Dishes
These cookies pair delightfully with a warm cup of spiced apple cider or a glass of vanilla almond milk. For Halloween parties, serve alongside other themed treats like pumpkin cupcakes or black licorice for a fun contrast in flavors and textures.
Creative Ways to Present
Arrange your mummy cookies on a platter lined with shredded coconut tinted with food coloring to look like “creepy cobwebs.” You can also set them atop carved pumpkin halves or use mini gravestones as labels to enhance the spooky vibe at your next gathering.
Make Ahead and Storage
Storing Leftovers
Store baked and decorated mummy cookies in an airtight container at room temperature for up to 3 days. To keep the frosting fresh and prevent it from drying out, separate layers with parchment paper.
Freezing
You can freeze unbaked cookie dough balls by placing them on a tray, freezing until solid, then transferring them to a freezer-safe bag for up to 3 months. For decorated cookies, freeze them fully cooled on a flat tray before storing in an airtight container; thaw at room temperature before serving.
Reheating
Reheat cookies by allowing them to come to room temperature naturally. If you prefer warm cookies, pop them in a 300-degree oven for 5 minutes, but avoid microwaving as this can soften the frosting and spoil the mummy look.
FAQs
Can I use a different sweetener instead of maple syrup?
Yes! If you don’t have maple syrup on hand, you can substitute with honey or light corn syrup, though maple adds a unique richness that pairs beautifully with the cinnamon.
What if I don’t have edible icing eyes?
No worries! You can make your own eyes using small dots of white and black icing or mini chocolate chips. Both options add a charming homemade touch to your mummy cookies.
Are these cookies gluten-free friendly?
This recipe calls for all-purpose flour, which contains gluten. To make a gluten-free version, try using a gluten-free baking blend, but results may vary slightly in texture.
How do I make sure the frosting doesn’t smear when piping the mummy wraps?
Make sure your frosting is thick enough by adjusting the amount of powdered sugar. Chilled cookies also help the frosting set quickly and hold its shape so your mummy stripes stay distinct.
Can I add other spices to the cookie dough?
Absolutely! Nutmeg, allspice, or a pinch of ginger can complement the cinnamon nicely and add a bit more depth to the flavor palette without overpowering the cookies.
Final Thoughts
There’s something truly special about making cookies that bring joy not only with their taste but with their playful appearance, and this Mummy Cookies Recipe delivers both in spades. Whether you’re baking for a festive party, a cozy night at home, or just to satisfy a sweet craving, these mummies will be the highlight. So grab your mixing bowl, have some fun with the frosting, and get ready to enjoy some deliciously spooky treats that everyone will love!
Print
Mummy Cookies Recipe
- Prep Time: 15 minutes
- Cook Time: 12 minutes
- Total Time: 57 minutes
- Yield: 10 large cookies
- Category: Dessert
- Method: Baking
- Cuisine: American
- Diet: Vegetarian
Description
These festive Mummy Cookies are a fun and spooky treat perfect for Halloween. Soft and chewy with a hint of cinnamon, these cookies are decorated with creamy vanilla frosting piped to look like mummy wrappings and finished with adorable edible icing eyes.
Ingredients
Dry Ingredients
- 3 cup all-purpose flour
- 1 tsp baking powder
- ½ tsp baking soda
- 1 tsp cinnamon
- ½ tsp kosher salt
Wet Ingredients
- 1 cup unsalted butter, melted
- 1 ½ cup light brown sugar, packed
- ⅓ cup maple syrup
- 1 tsp pure vanilla extract
- 1 large egg
Frosting Ingredients
- 1 cup unsalted butter, softened
- 2 ½ – 3 cup powdered sugar
- 2 tsp pure vanilla extract
- 4 Tbsp heavy whipping cream
- 20 edible icing eyes
Instructions
- Combine Dry Ingredients: Whisk together the flour, baking powder, baking soda, cinnamon, and kosher salt in a large bowl until fully mixed.
- Melt Butter: Place 1 cup of unsalted butter in a heat-proof bowl and microwave until melted; then set aside to cool slightly.
- Mix Wet Ingredients: To the melted butter, add the light brown sugar, maple syrup, and 1 tsp vanilla extract. Stir well to combine.
- Add Egg: Stir in the large egg until the mixture is smooth and well blended.
- Combine Mixtures: Add the dry flour mixture to the wet butter mixture. Using a hand mixer, mix just until combined to form the cookie dough.
- Chill Dough: Cover the dough bowl tightly with plastic wrap and refrigerate for 30 minutes to firm up.
- Preheat Oven & Prep Baking Sheet: Preheat your oven to 375°F (190°C) and line a baking sheet with a silicone mat or parchment paper.
- Shape Cookies: Scoop large cookie-sized balls from the chilled dough and place them 2 inches apart on the prepared baking sheet. Return any remaining dough balls to the refrigerator.
- Bake Cookies: Bake one tray at a time at 375°F for 10–12 minutes until the cookies puff slightly and edges show a slight beige color.
- Cool Cookies: Let the cookies cool on the baking sheet for 5 minutes before transferring to a wire rack to cool completely.
- Prepare Frosting: Beat the softened butter with powdered sugar, vanilla extract, and heavy cream until smooth and fluffy to create the frosting.
- Decorate as Mummies: Using a piping bag or spatula, spread or pipe the frosting over the cooled cookies in a mummy-wrap pattern. Place edible icing eyes onto each cookie to finish the mummy look.
Notes
- Ensure the melted butter is not too hot before mixing with sugar and egg to avoid cooking the egg.
- Chilling the dough helps prevent the cookies from spreading too much while baking.
- Use a piping bag with a flat tip to create the mummy bandage effect with the frosting for best results.
- Cookies can be stored in an airtight container for up to 5 days.
- Edible icing eyes can be found at specialty baking stores or online around Halloween season.