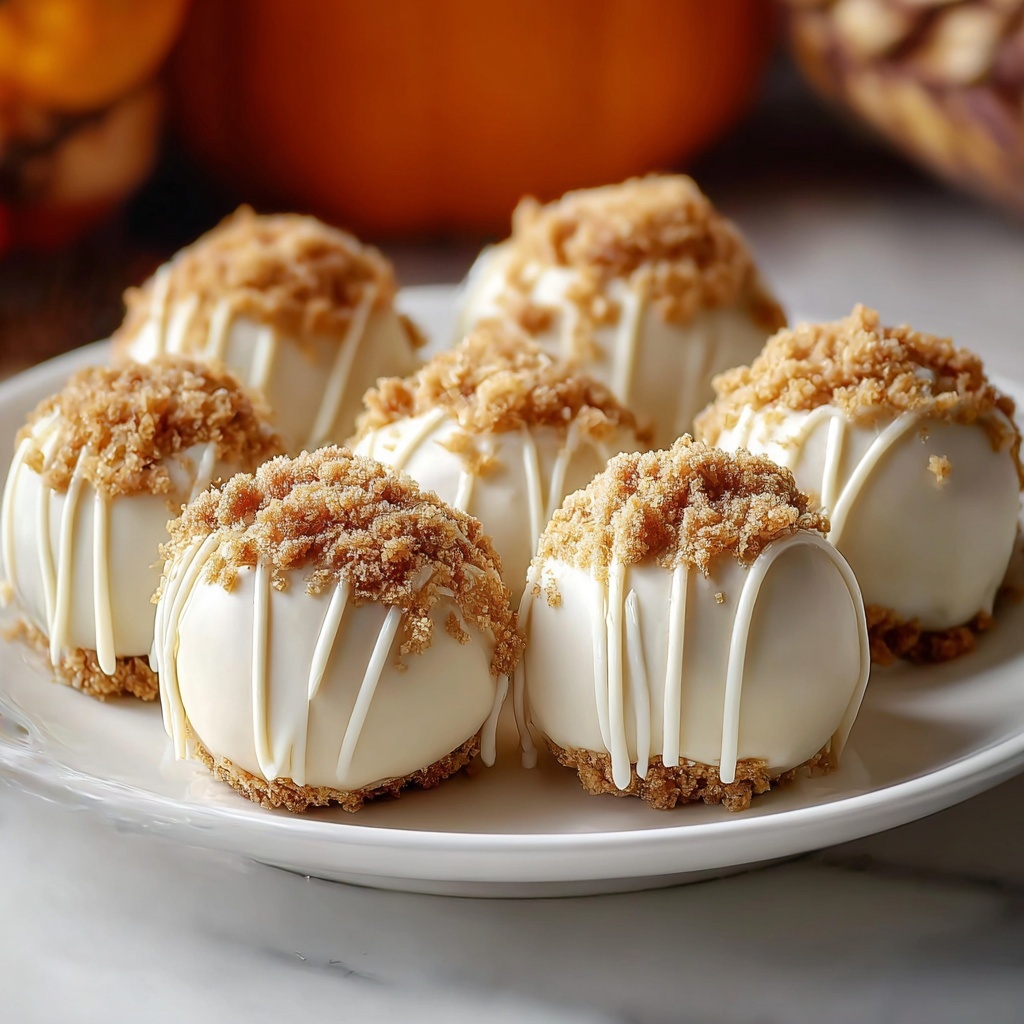
If you’re craving a festive, creamy, and utterly delightful treat that’s as easy to make as it is delicious, then this No Bake Pumpkin Cheesecake Balls Recipe is your new best friend. These little bites of autumn joy blend the perfect balance of smooth cream cheese and pumpkin puree, kissed with warm spices and wrapped in a luscious white chocolate coating. They come together quickly, require zero oven time, and deliver big on flavor, making them ideal for any holiday gathering or whenever you want to indulge in a seasonal favorite without fuss.

Ingredients You’ll Need
The beauty of this No Bake Pumpkin Cheesecake Balls Recipe lies in its simplicity and how each ingredient plays a crucial role in creating the perfect texture and flavor harmony. From the creamy tang of cream cheese to the cozy spice warmth and crisp graham cracker notes, every component enhances the overall experience in a unique way.
- Cream cheese: Provides a rich, creamy base that balances the pumpkin’s earthiness perfectly.
- Canned pumpkin puree: Brings that classic fall flavor and moisture, ensuring the bites are luscious and soft.
- Graham cracker crumbs: Add a subtly sweet, slightly crunchy texture that mimics the crust of a traditional cheesecake.
- Powdered sugar: Sweetens and helps create a smooth texture that melts in your mouth.
- Pumpkin pie spice: Infuses warm notes of cinnamon, nutmeg, and cloves, giving these balls their distinct seasonal charm.
- Vanilla extract: Enhances all the flavors and adds a lovely aromatic depth.
- White chocolate chips: Used for coating, they add a sweet, creamy shell that perfectly encloses the pumpkin cheesecake centers.
How to Make No Bake Pumpkin Cheesecake Balls Recipe
Step 1: Mix the Creamy Base
Start by softening your cream cheese to room temperature and then combine it thoroughly with the canned pumpkin puree in a large bowl. Mixing until smooth ensures every bite is silky and luscious, creating the foundation for the cheesecake balls.
Step 2: Add Dry Ingredients and Flavor
Next, stir in the graham cracker crumbs, powdered sugar, pumpkin pie spice, and vanilla extract. These ingredients not only bring flavor complexity but also help firm up the mixture so it holds its shape later. Mixing until everything is well incorporated is key to a uniform taste and texture.
Step 3: Chill the Mixture
Cover the bowl with plastic wrap and pop it into the refrigerator for at least one hour. This step is essential because chilling firms up the mixture, making it much easier to roll into neat, manageable balls without sticking to your hands.
Step 4: Form the Balls
After chilling, scoop about one tablespoon of the mixture at a time and roll it between your palms to create smooth, round balls. Placing them on a parchment-lined baking sheet prevents sticking and keeps them looking pristine for dipping.
Step 5: Freeze to Firm Up
Place the formed balls in the freezer for 20 to 30 minutes. This extra chilling step ensures they’re solid enough to coat in chocolate, which helps create a satisfying snap when you bite into them later.
Step 6: Melt the White Chocolate
While the balls chill, melt your white chocolate chips in a microwave-safe bowl. Heat them in short bursts, stirring frequently for a smooth, glossy finish perfect for coating.
Step 7: Dip and Coat
Retrieve your pumpkin cheesecake balls from the freezer and dip each one into the melted white chocolate using a fork. Allow any excess chocolate to drip back into the bowl to avoid clumpy coatings, then carefully place each ball back onto the parchment paper.
Step 8: Set the Coating
Let the chocolate coating firm up at room temperature or pop the sheet back into the refrigerator to speed up the process. This step turns the outside into a beautiful, glossy shell that’s a perfect foil to the soft interior.
Step 9: Serve and Enjoy
Once the coating is set, your pumpkin cheesecake balls are ready to be enjoyed. Whether chilled straight from the fridge or left to warm slightly at room temperature, they’ll delight your taste buds every time.
How to Serve No Bake Pumpkin Cheesecake Balls Recipe

Garnishes
Sprinkle a dash of extra pumpkin pie spice or crushed graham cracker crumbs on top for a charming finish. A light dusting of cinnamon or even a drizzle of caramel sauce can add an exciting twist that elevates the presentation and flavor.
Side Dishes
Pair these cheesecake balls with a warm cup of spiced chai tea, coffee, or hot apple cider to complement their autumnal flavors beautifully. They also work wonderfully alongside fresh fruit platters or simple whipped cream for a more indulgent experience.
Creative Ways to Present
Arrange these pumpkin cheesecake balls on a rustic wooden platter adorned with autumn leaves or inside mini cupcake liners for a festive touch. For parties, consider placing them on decorative skewers or creating a bite-sized dessert board that invites everyone to nibble and savor.
Make Ahead and Storage
Storing Leftovers
Keep any leftover pumpkin cheesecake balls in an airtight container in the refrigerator to maintain freshness. They will stay delicious for up to 4 days, making them a perfect make-ahead dessert for busy schedules.
Freezing
These cheesecake balls freeze beautifully. Arrange them on a baking sheet lined with parchment paper and freeze until solid, then transfer to a freezer-safe bag or container. They’ll keep well for up to 2 months and can be thawed overnight in the refrigerator when you’re ready to enjoy them.
Reheating
Since these are best enjoyed chilled, reheating isn’t necessary. If the chocolate coating feels too firm from the refrigerator or freezer, simply let the balls sit at room temperature for 10-15 minutes to soften slightly before serving.
FAQs
Can I use fresh pumpkin instead of canned pumpkin puree?
Fresh pumpkin can be used, but it needs to be cooked and pureed until smooth first. Keep in mind canned pumpkin puree is more consistent in moisture and texture, which makes the recipe more reliable and simple.
What can I substitute for white chocolate chips?
You can use milk or dark chocolate chips if you prefer a richer, less sweet coating. Just melt them the same way and enjoy a slightly different flavor profile that pairs wonderfully with pumpkin spices.
Are these cheesecake balls suitable for kids?
Absolutely! These bite-sized treats are mild, sweet, and creamy—perfect for kids and adults alike. Just keep an eye on the white chocolate coating if anyone has allergies, and you might want to omit spicier ingredients for little ones.
Can I make these vegan or dairy-free?
Yes, replacing the cream cheese with a dairy-free alternative and using dairy-free white chocolate chips can turn these pumpkin cheesecake balls into a vegan-friendly dessert. Just pick high-quality substitutes for the best texture and flavor.
Why do I need to freeze the balls before dipping?
Freezing firms up the cheesecake balls so they hold their shape during the dipping process. It also helps the chocolate coating set quickly and smoothly without melting the inside, giving you that perfect contrast of textures.
Final Thoughts
This No Bake Pumpkin Cheesecake Balls Recipe is truly a gem for anyone who loves fall flavors and easy desserts. It’s a cozy, crowd-pleasing treat you can whip up quickly, no oven needed, and it’s sure to become a regular in your seasonal dessert rotation. Give it a try, and I promise you’ll be reaching for these delightful balls of pumpkin spice bliss all autumn long!
Print
No Bake Pumpkin Cheesecake Balls Recipe
- Prep Time: 0h 15m
- Cook Time: 0h 5m
- Total Time: 1h 50m
- Yield: Approximately 24 balls
- Category: Dessert
- Method: No-Cook
- Cuisine: American
- Diet: Vegetarian
Description
Delightfully creamy no-bake pumpkin cheesecake balls coated in a smooth white chocolate shell, perfect for an easy, festive fall treat that requires minimal preparation and no oven time.
Ingredients
Main Ingredients
- 8 oz cream cheese, softened
- 1 cup canned pumpkin puree
- 1 cup graham cracker crumbs
- 1 ½ cups powdered sugar
- 2 teaspoons pumpkin pie spice
- 1 teaspoon vanilla extract
Coating
- 1 cup white chocolate chips (or desired coating)
Instructions
- Prepare the mixture: In a large mixing bowl, combine the softened cream cheese and canned pumpkin puree. Mix until smooth and creamy.
- Add dry ingredients: Stir in the graham cracker crumbs, powdered sugar, pumpkin pie spice, and vanilla extract until the mixture is uniformly smooth and well combined.
- Chill the mixture: Cover the bowl with plastic wrap and refrigerate for at least 1 hour, or until the mixture is firm enough to handle.
- Form balls: Once chilled, scoop out small portions of the mixture (about 1 tablespoon) and roll them into balls using your hands. Place the balls on a parchment-lined baking sheet.
- Freeze the balls: Chill the balls in the freezer for about 20-30 minutes to firm up properly.
- Melt coating: While the balls are chilling, melt the white chocolate chips in a microwave-safe bowl, stirring every 15-20 seconds until fully melted and smooth.
- Dip in chocolate: Remove the pumpkin cheesecake balls from the freezer and dip each one into the melted white chocolate using a fork. Let the excess chocolate drip off before placing them back onto the parchment-lined sheet.
- Set the coating: Allow the white chocolate coating to set. To speed up this process, refrigerate the balls again if desired.
- Serve: Once the coating has firmed, serve the pumpkin cheesecake balls chilled or at room temperature for a delicious fall treat.
Notes
- For best results, ensure cream cheese is very soft to achieve a smooth mixture.
- Substitute white chocolate chips with dark or milk chocolate if preferred for coating.
- You can add a pinch of salt to balance sweetness if desired.
- Store the cheesecake balls in an airtight container in the refrigerator for up to 5 days.
- Freezing the balls first helps the coating to set faster and prevents melting during dipping.